Installation and Setup#
Overview#
SysGit offers flexible deployment options to match your organization's security posture and infrastructure preferences. This guide covers both IT-supported and self-service deployment strategies.
Choosing Your Deployment Model#
SysGit supports two deployment approaches, each with distinct characteristics suited to different organizational contexts.
IT-Supported Deployment#
There is a convenience associated with users only needing a URL to access their information. An IT-supported deployment of SysGit includes all relevant services needed to deliver the client application via the browser. This deployment model also supports AI features, which require access to an enterprise-provisioned LLM.
| Pros | Cons |
|---|---|
| A consistent experience across all users | Requires IT involvement to deploy and keep updated |
| Users just access a URL within their enterprise | |
| Currently the only way to support any machine learning capability |
In the IT-supported deployment strategy, the deployment team will set up the appropriate authorizations allowing SysGit to query your Git provider for user login and relevant in-repo data. For any ML features, the team will also set up API access to an LLM of their choice, assuming it adheres to the OpenAI OpenAPI "standard."
If your enterprise has not selected a Git provider, we can provide a streamlined deployment package including the open-source Gitea provider. Please note that not all features—specifically any around CI/CD pipelines—are available with Gitea.
Self-Service Deployment#
SysGit is compiled using industry-standard Electron technology—the same used by VSCode and Slack—and delivered as a client-only installer.
| Pros | Cons |
|---|---|
| IT involvement not required (beyond any usual authorizations, if any) | Users must update their deployments on their own |
In a self-service deployment, individual users generate an API key from their Git provider and configure SysGit directly. This approach provides maximum flexibility and eliminates dependency on IT deployment schedules.
IT-Supported Deployment#
Prerequisites#
Before deploying SysGit in an IT-supported environment, ensure you have:
- Access to a Git provider (GitHub Enterprise, GitLab, or Gitea)
- (Optional) Access to an enterprise LLM for AI features
- Administrator access to configure OAuth applications
- Appropriate network access and firewall rules
Installation Steps#
IT-supported deployment delivers SysGit through a centralized server infrastructure, providing users with browser-based access to the application. This deployment model consists of lightweight microservices that integrate with your existing Git provider and (optionally) your enterprise LLM infrastructure.
The deployment package includes: - SysGit application server - Integration configuration for your Git provider - (Optional) AI/ML feature connectivity to enterprise LLM
For detailed installation instructions, consult the README.md file included with your software package or contact your SysGit technical account team.
Configuration#
IT-supported deployments require configuration of OAuth integrations with your Git provider to enable secure authentication and authorization flows. The deployment team will configure:
- API access endpoints for your Git provider
- OAuth application credentials
- (If applicable) LLM API access credentials
- Network routing and firewall rules
Users access SysGit through a URL within your enterprise network and authenticate using your organization's existing identity management system.
User Provisioning#
User access is managed entirely through your Git provider's authentication and authorization systems. SysGit inherits your existing:
- Single Sign-On (SSO) configuration
- Role-Based Access Control (RBAC) settings
- Repository permission models
- Audit logging and compliance monitoring
No separate user provisioning is required in SysGit itself—users gain access to projects based on their Git repository permissions.
Self-Service Deployment#
Download and Install#
SysGit's self-service deployment is delivered as a desktop application built with Electron technology, compatible with macOS, Windows, and Linux operating systems.
To install SysGit:
- Access the download portal provided by your SysGit technical account team
- Select the appropriate installer for your operating system:
- macOS:
SysGit-[version]-arm64.dmg(Apple Silicon) orSysGit-[version]-x64.dmg(Intel) - Windows:
SysGit-[version]-win64.exe - Linux:
SysGit-[version]-linux-x64.AppImage - Download the installer to your local machine
- Run the installer following standard installation procedures for your platform
macOS Installation:
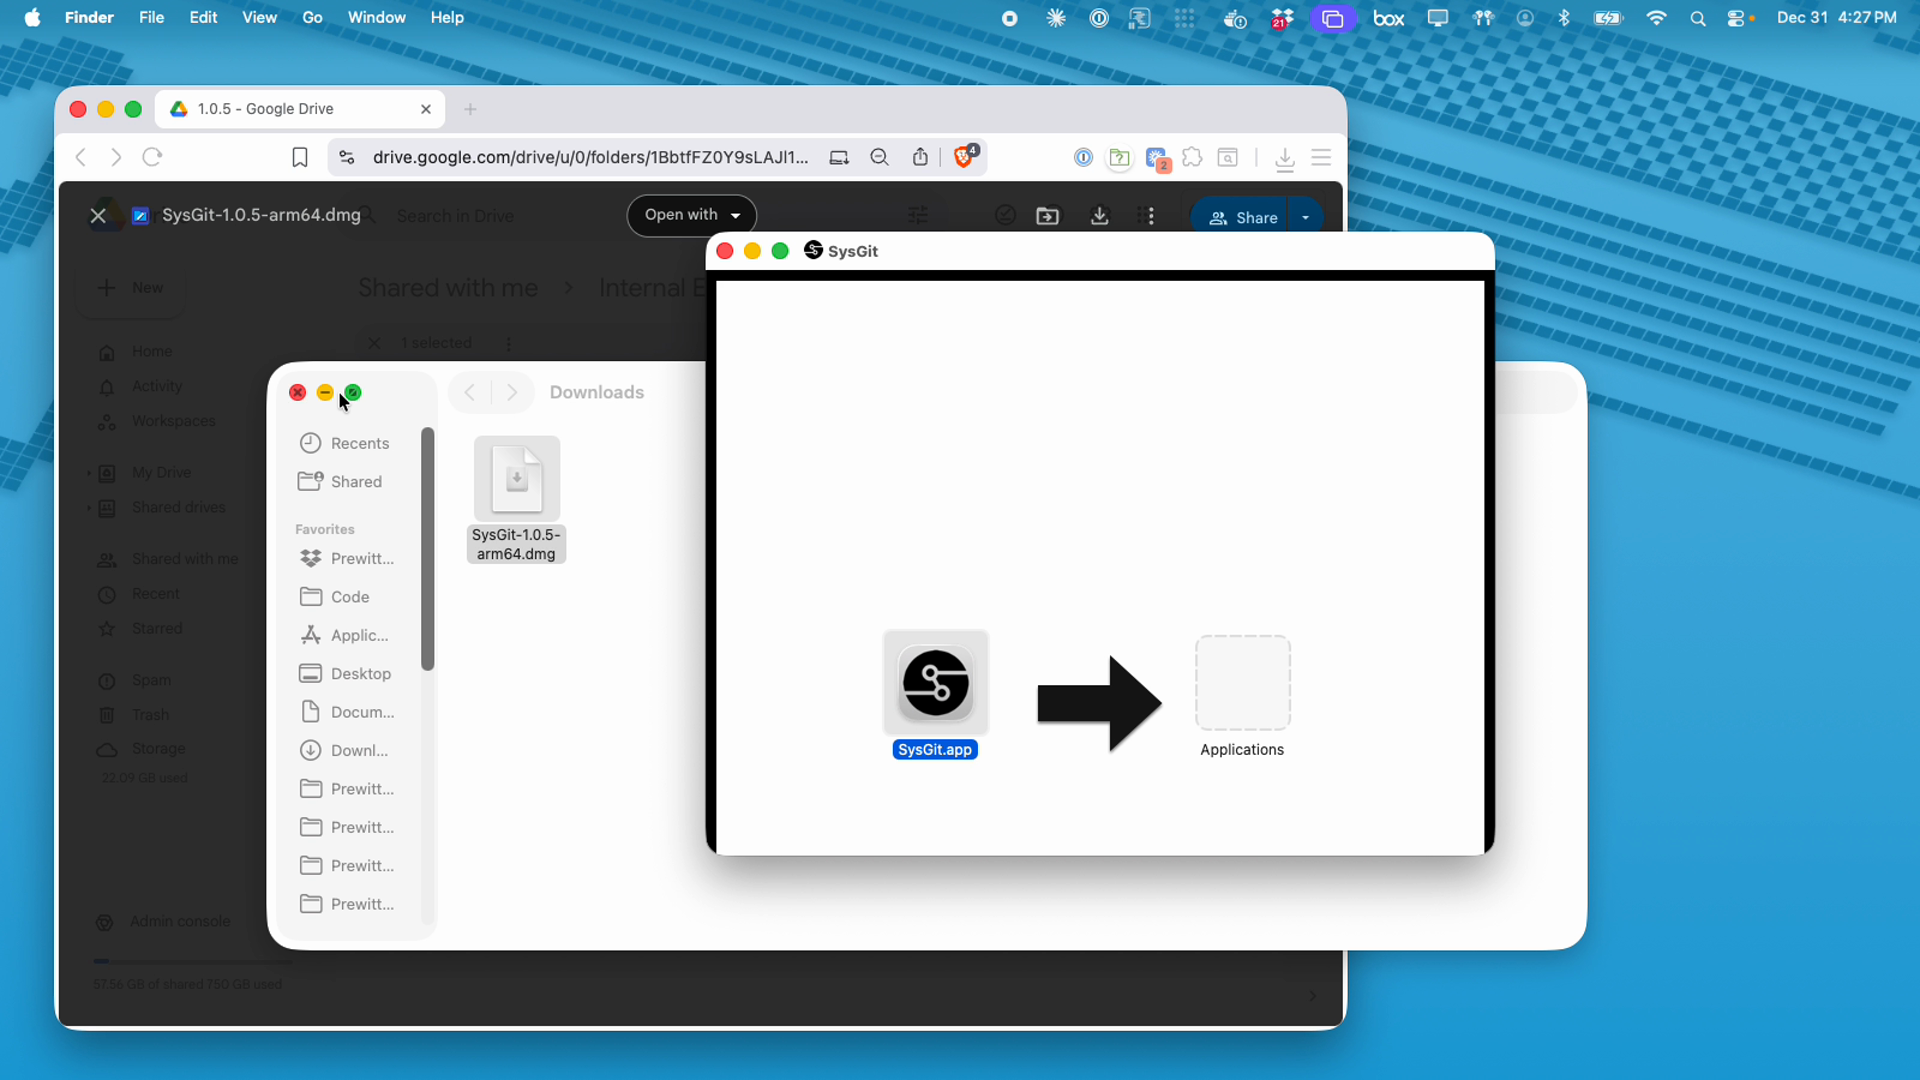
Open the downloaded .dmg file and drag the SysGit application to your Applications folder. On first launch, you may need to override macOS Gatekeeper security by right-clicking the application and selecting "Open."
Windows Installation:
Run the downloaded .exe installer and follow the installation wizard prompts. The application will be installed to your Program Files directory.
Linux Installation:
Make the downloaded .AppImage file executable and run it directly, or integrate it with your system's application menu using AppImage integration tools.
API Key Generation#
Self-service deployment requires generating a personal access token from your Git provider. This token enables SysGit to authenticate with your Git infrastructure and access your repositories. Remember that SysGit will have access to all the information that your API key has authorized.
Security Note: Your personal access token grants SysGit the same repository access as your user account. Treat tokens like passwords—never commit them to version control or share them in unsecured communications.
GitLab API Key#
To generate a GitLab personal access token:
- Log into your GitLab instance through your web browser
- Click your user avatar (top-right) and select "Edit profile"
- In the left sidebar, navigate to "Personal access tokens"
- Click "Add new token"
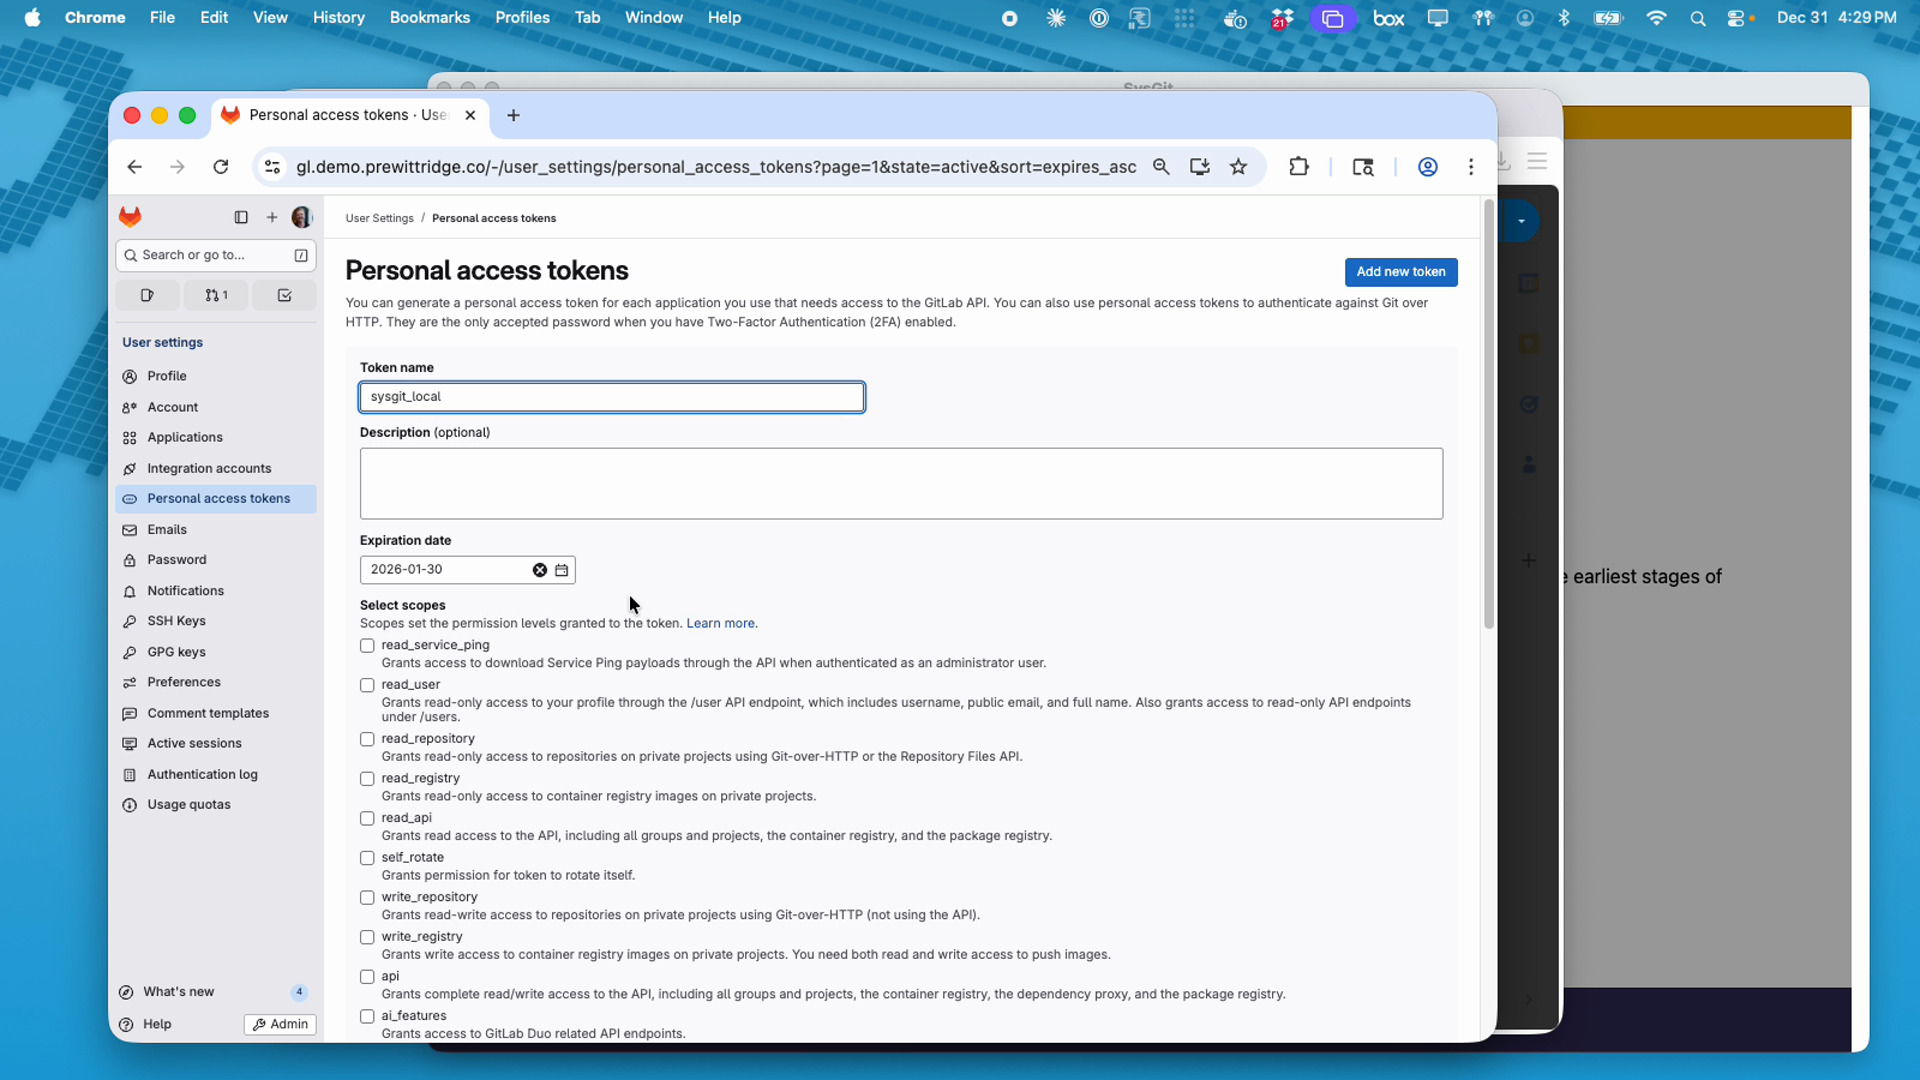
- Configure the token:
- Token name: Enter a descriptive name (e.g.,
sysgit_local) - Expiration date: Set according to your organization's security policy
- Select scopes: Grant the following permissions:
write_repository(required): Read-write access to repositoriesread_repository(recommended): Read-only access to repositoriesread_api(recommended): Read access to API endpoints
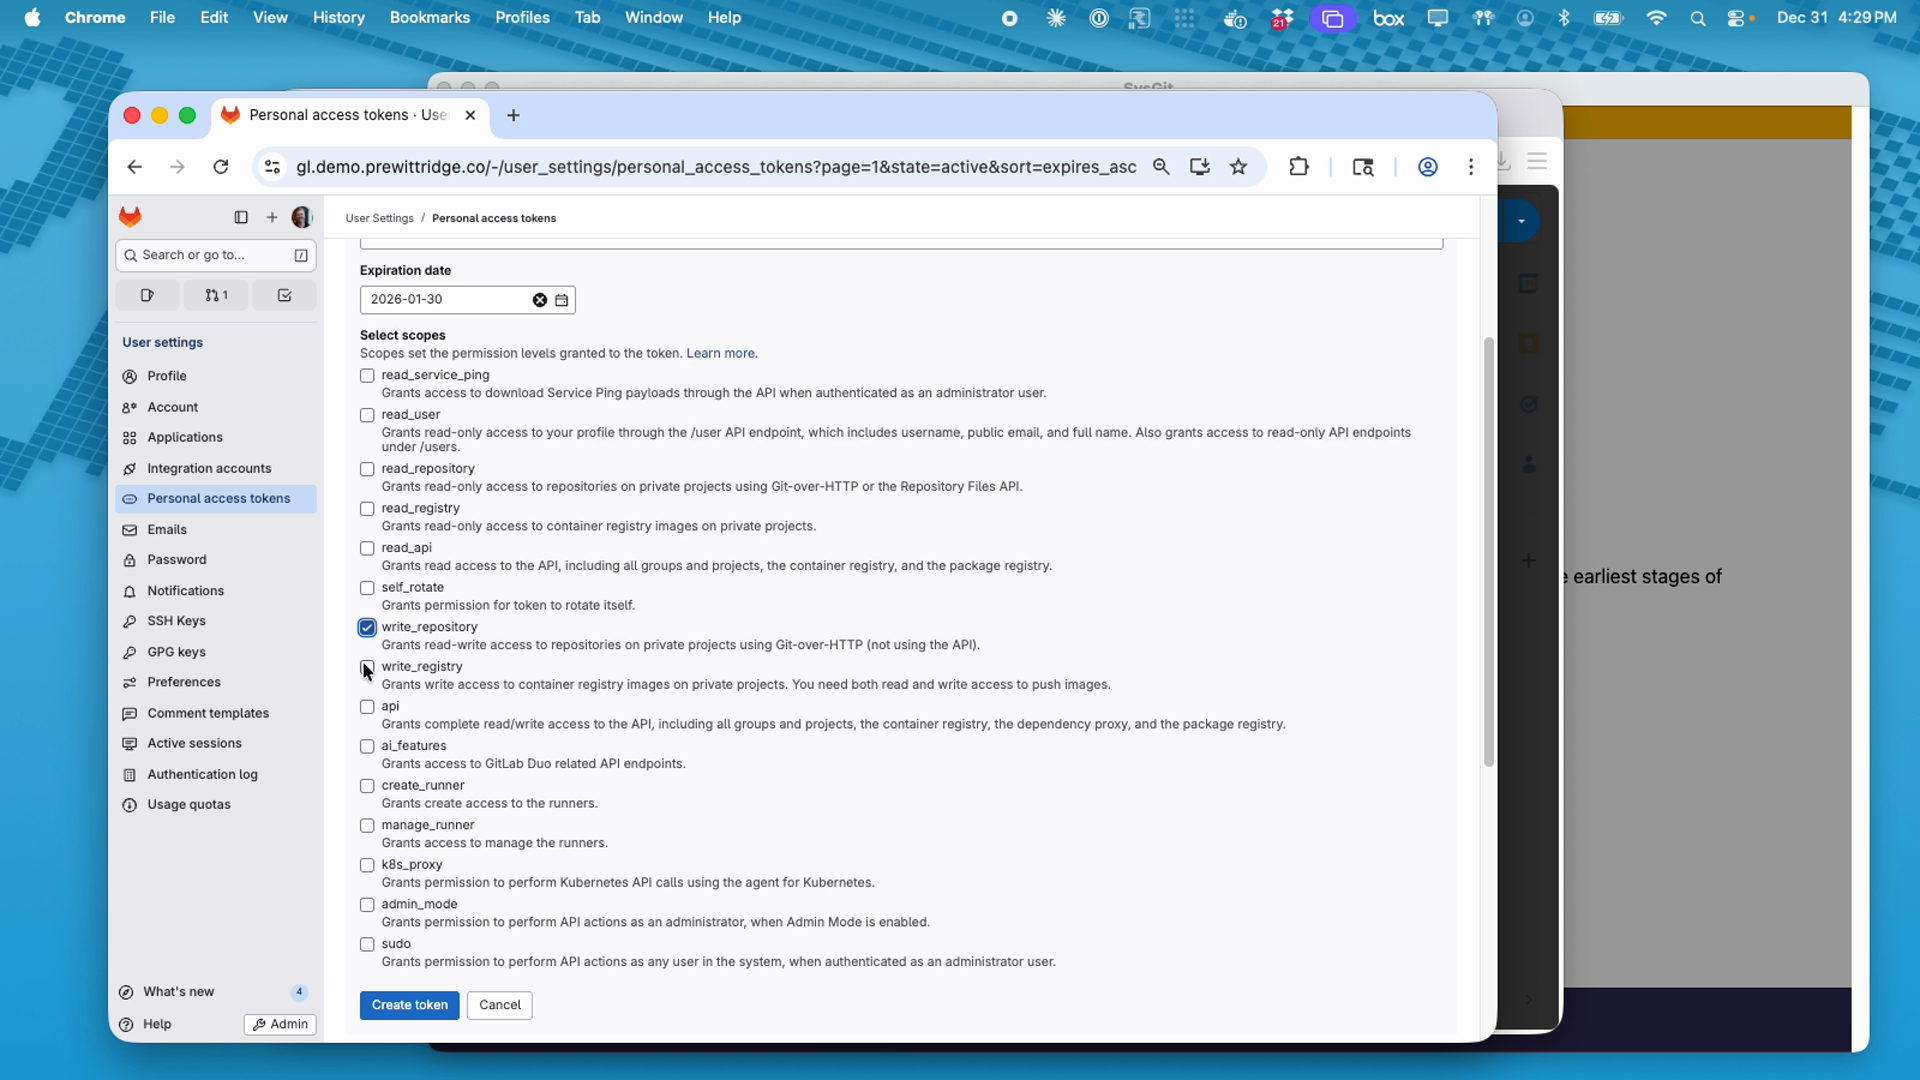
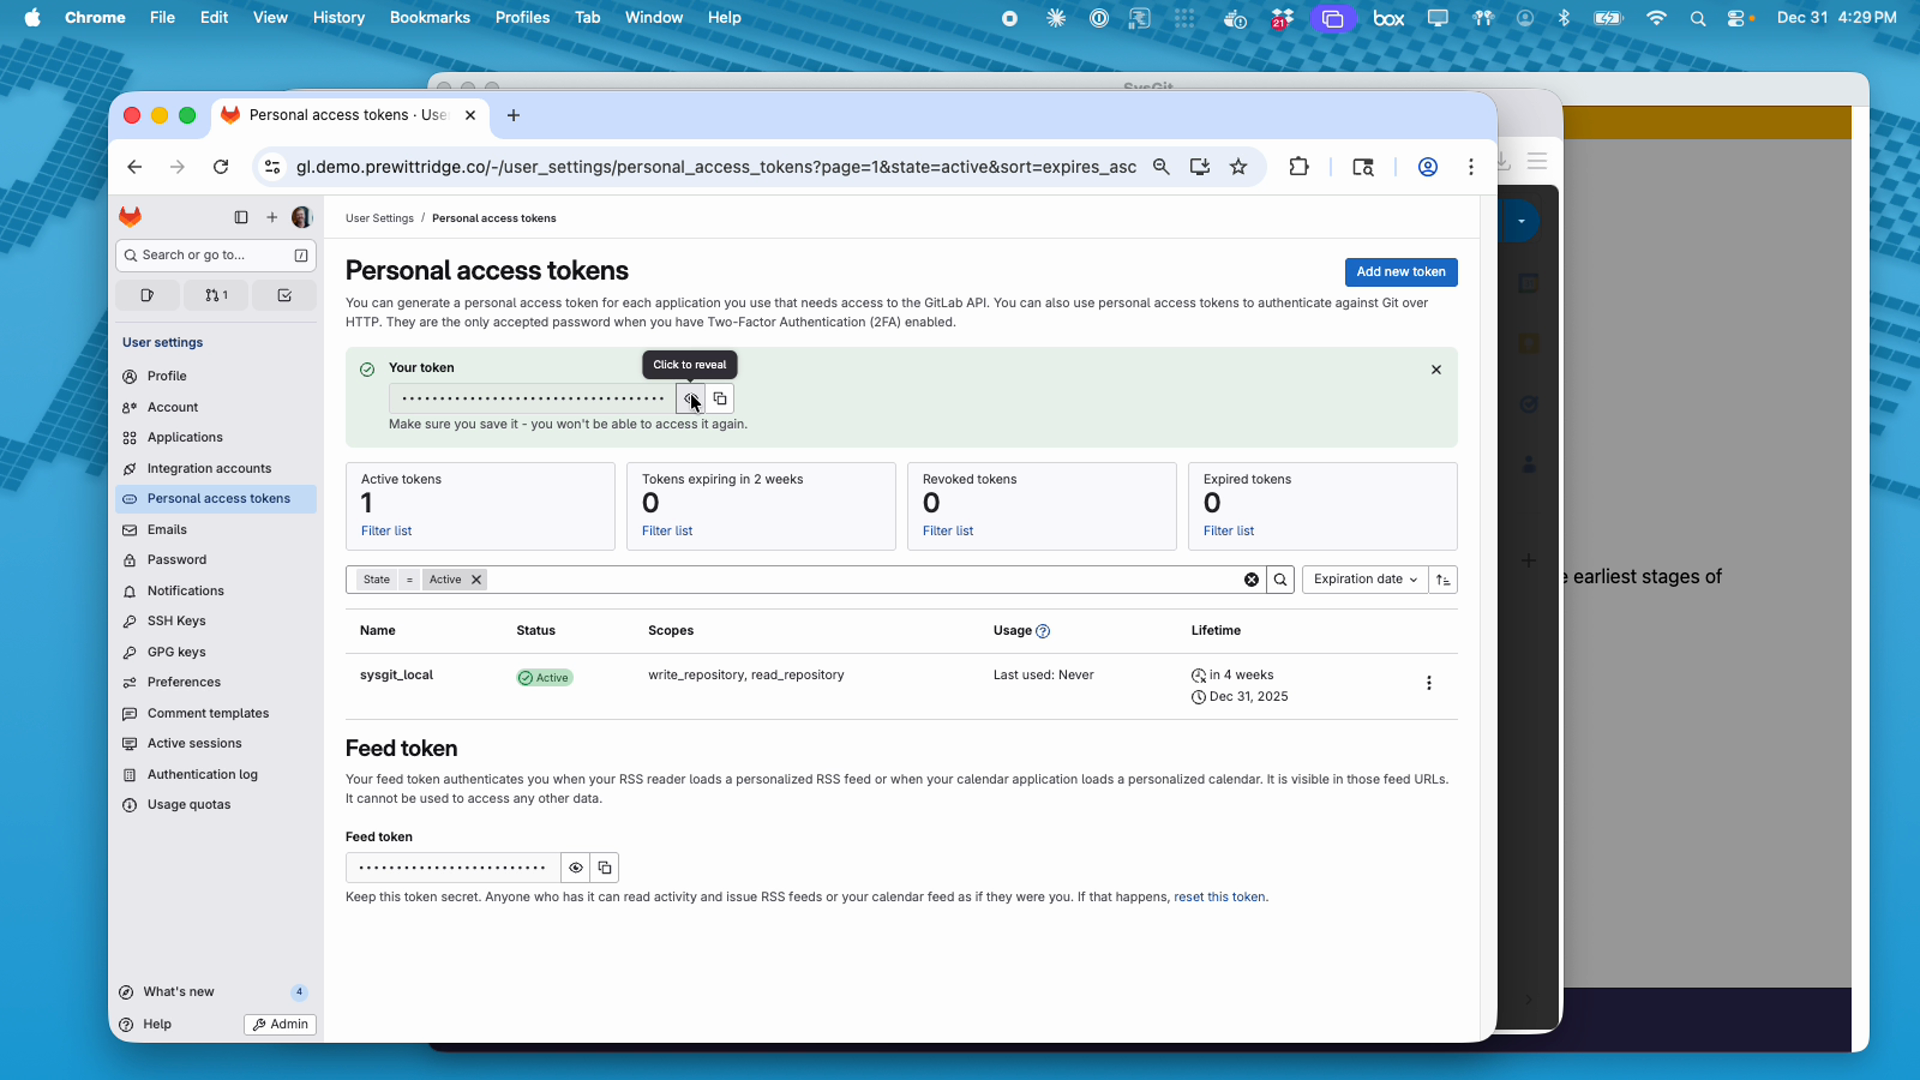
- Click "Create token"
- Important: Copy the generated token immediately—you won't be able to view it again
Token Management Best Practices: - Establish a regular token rotation schedule aligned with security policies - Only grant minimum required scopes for SysGit functionality - Store tokens securely—never in plain text files - Revoke compromised tokens immediately through GitLab's token management page - Monitor token usage through the "Last used" timestamp
GitHub API Key#
To generate a GitHub personal access token:
- Log into GitHub (GitHub.com or your GitHub Enterprise instance)
- Click your profile photo (top-right) and select "Settings"
- In the left sidebar, scroll to "Developer settings"
- Select "Personal access tokens" → "Tokens (classic)"
- Click "Generate new token" → "Generate new token (classic)"
- Configure the token:
- Note: Enter a descriptive name (e.g.,
sysgit_local) - Expiration: Set according to your organization's security policy
- Select scopes: Grant the following permissions:
repo(required): Full control of private repositoriesread:user(recommended): Read user profile data
- Click "Generate token"
- Copy the generated token immediately—you won't be able to view it again
For fine-grained personal access tokens:
GitHub also offers fine-grained tokens with more granular permission control. If using fine-grained tokens, ensure they include: - Repository access: Read and Write access to code - Repository permissions: Contents (Read and Write), Metadata (Read)
Gitea API Key#
To generate a Gitea access token:
- Log into your Gitea instance
- Click your profile icon (top-right) and select "Settings"
- Navigate to "Applications" in the left sidebar
- In the "Manage Access Tokens" section, enter a token name (e.g.,
sysgit_local) - Click "Generate Token"
- Copy the generated token immediately—you won't be able to view it again
Note: Gitea tokens have full access to all repositories accessible to your user account. There is no scope limitation mechanism in Gitea.
First-Time Configuration#
After installing SysGit, configure your Git provider connection:
- Launch SysGit from your Applications folder (macOS), Start Menu (Windows), or application launcher (Linux)
- On the welcome screen, click "Integrations" in the left sidebar
- Select your Git provider from the available options:
- Gitea Provider
- GitLab Provider
- GitHub Provider
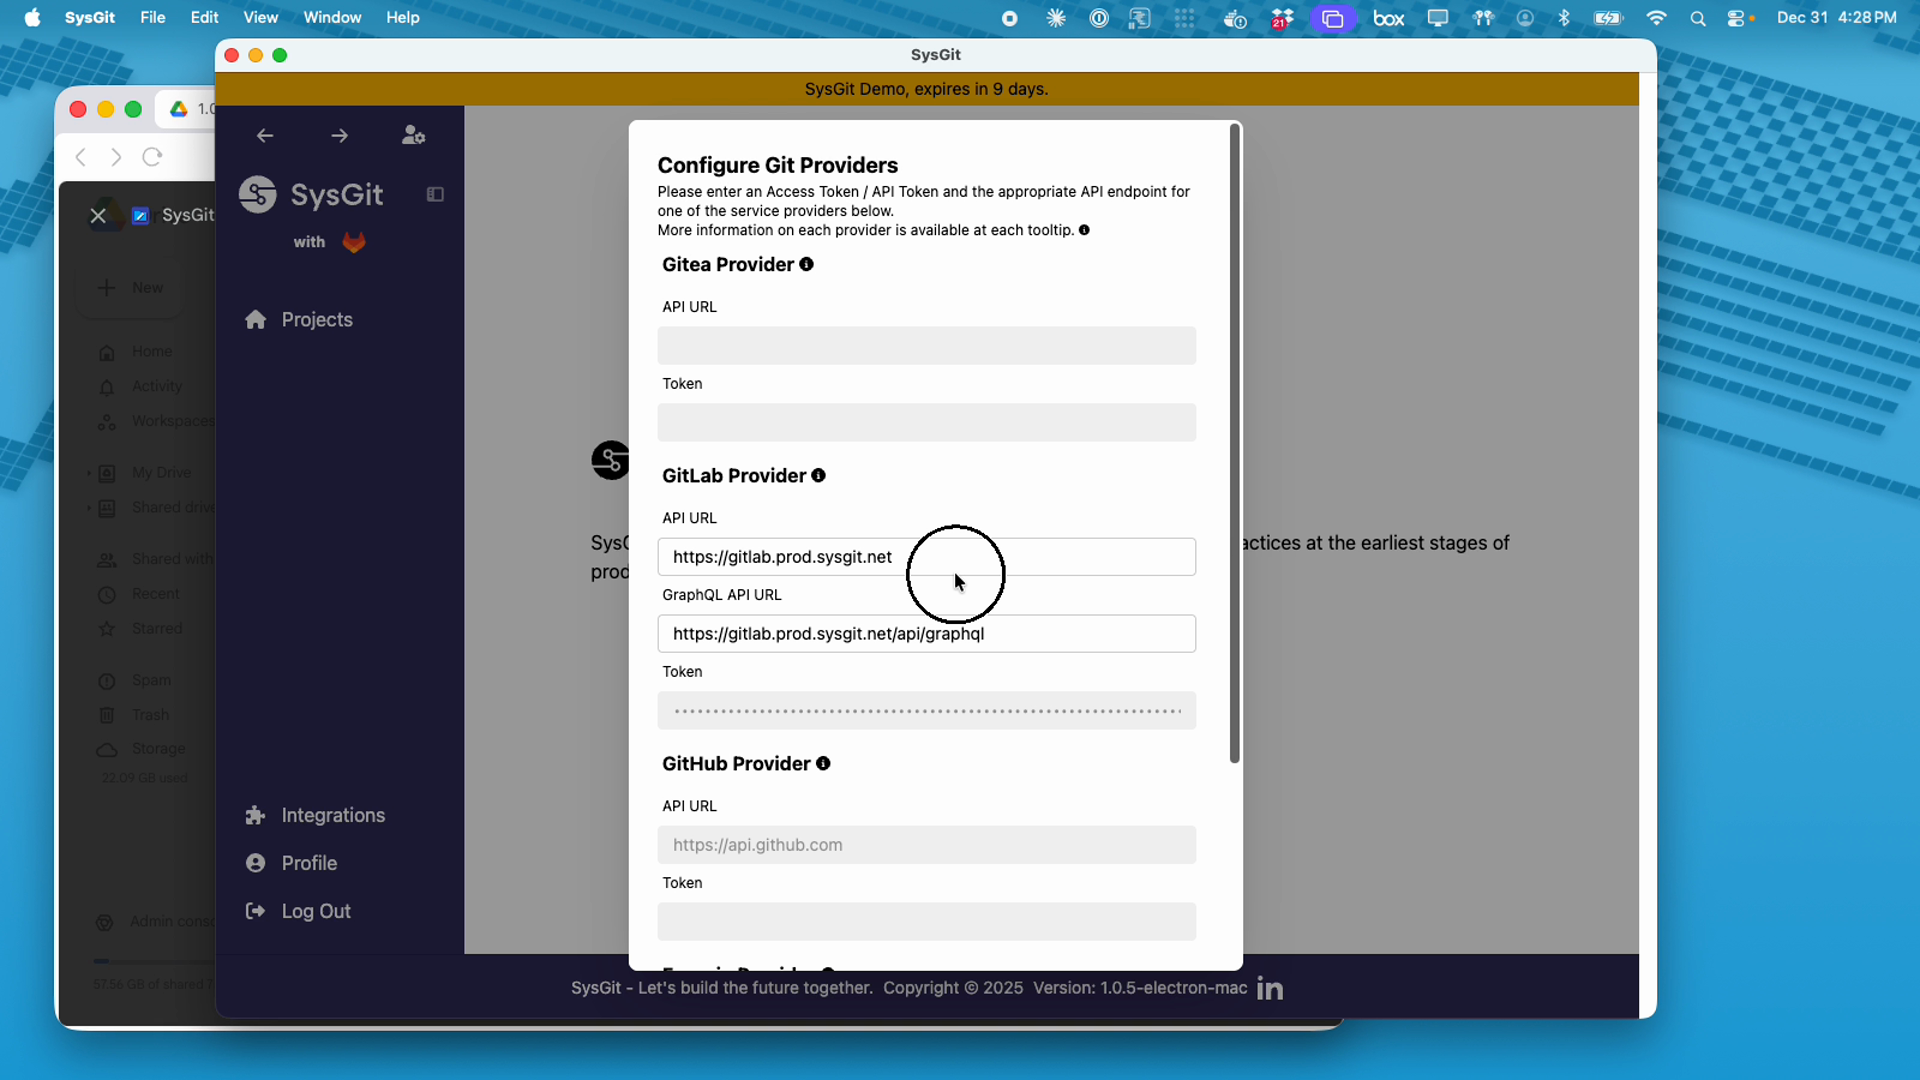
- Enter your configuration details:
For GitLab:
- API URL: Your GitLab instance URL (e.g., https://gitlab.company.com)
- GraphQL API URL: Your GitLab GraphQL endpoint (e.g., https://gitlab.company.com/api/graphql)
- Token: Paste your personal access token
For GitHub:
- API URL: https://api.github.com (for GitHub.com) or your GitHub Enterprise API endpoint
- Token: Paste your personal access token
For Gitea:
- API URL: Your Gitea instance URL (e.g., https://gitea.company.com)
- Token: Paste your access token
- Click "Save" or "Connect" to validate the connection
- Once authenticated, navigate to "Projects" to access your repositories
Security Reminder: SysGit will have access to all repositories that your API key authorizes. Review your token's scope and expiration settings regularly.
Troubleshooting Connection Issues#
Issue: Token authentication fails
Solution:
- Verify the token has not expired
- Confirm the token includes required scopes (write_repository for GitLab, repo for GitHub)
- Ensure API URLs match your Git instance exactly (including https:// protocol)
- Verify your Git instance is accessible from your network
Issue: Projects do not appear after successful authentication
Solution:
- Confirm your user account has access to the intended projects in your Git provider
- Verify projects contain SysML v2 model files (.sysml file extensions)
- Check that you have appropriate repository permissions (at least Developer role for GitLab, Write access for GitHub)
Issue: Connection timeout or network errors
Solution:
- Verify your network can access the Git provider's API endpoints
- Check corporate firewall rules for API access
- Confirm VPN connection if required for your organization
- Test API connectivity using curl or similar tools
Issue: "Invalid token" or "Unauthorized" errors
Solution:
- Regenerate your personal access token with correct scopes
- Ensure you copied the complete token without truncation
- Verify the token was created for the correct Git provider account
- Check that the token has not been revoked in your Git provider settings
For additional support, contact your organization's systems engineering team or your SysGit technical account representative.
Next Steps#
After successfully installing and configuring SysGit, you can:
- Access existing projects: Clone repositories your team has created in your Git provider
- Create new repositories: Initialize new SysML v2 model projects
- Configure workflows: Set up branching strategies for collaborative development
- Explore interfaces: Learn the Table, Graph, and Code views for requirements and system modeling
Refer to the Requirements Management and System Modeling documentation for detailed guidance on using SysGit's features.