Requirements Management#
Welcome to Requirements Management in SysGit. This guide introduces you to how SysGit helps hardware development teams capture, organize, and track system requirements using modern version control practices.
What is Requirements Management?#
Requirements Management is the foundation of any complex engineering project. It's where we translate stakeholder needs into clear, verifiable specifications that guide the entire development process. Think of it as the formalized common ground between customers and engineers—where business needs meet technical reality.
At its simplest, requirements management involves:
- Capturing requirements: Recording "shall statements" that have been agreed upon between the engineering team and stakeholders
- Creating derived requirements: Breaking down high-level requirements into detailed specifications that match your development strategy
- Establishing verification: Defining how you'll prove each requirement has been met
- Maintaining traceability: Ensuring clear connections between customer needs, derived requirements, system design, and verification activities
SysGit brings these traditional activities into a Git-based workflow, giving you the power of version control, branching, and collaboration while maintaining full compliance with the SysML v2 open standard.
Three Ways to Work with Requirements#
SysGit offers three complementary interfaces for working with requirements, each designed for different tasks and preferences. You can switch between them freely—they all work with the same underlying data.
Table View: Rapid Entry and Organization#
The Table View provides a familiar spreadsheet-like experience, perfect for quickly entering multiple requirements or organizing them into hierarchies. It's ideal when you're: - Importing requirements from existing documents - Bulk editing requirement attributes - Organizing requirements into logical groups - Working in a structured, row-by-row manner
Graph View: Visual Relationships#
The Graph View shows your requirements as connected visual cards, making it easy to understand relationships and structure at a glance. Use this when you're: - Exploring how requirements relate to each other - Presenting your model structure to stakeholders - Creating new requirements with rich context - Visualizing decomposition hierarchies
Code View: Direct SysML v2 Authoring#
The Code View gives you direct access to the SysML v2 textual notation underneath. Advanced users appreciate this for: - Efficiently creating multiple requirements - Leveraging code editor features (search, replace, multi-cursor editing) - Making precise edits to requirement structure - Understanding exactly what's being stored in Git
The beauty of SysGit is that these views stay synchronized—make a change in one, and it's immediately reflected in the others.
Your First Requirement#
Let's create a simple requirement together. We'll use all three views to show how they work together.
Starting in Table View#
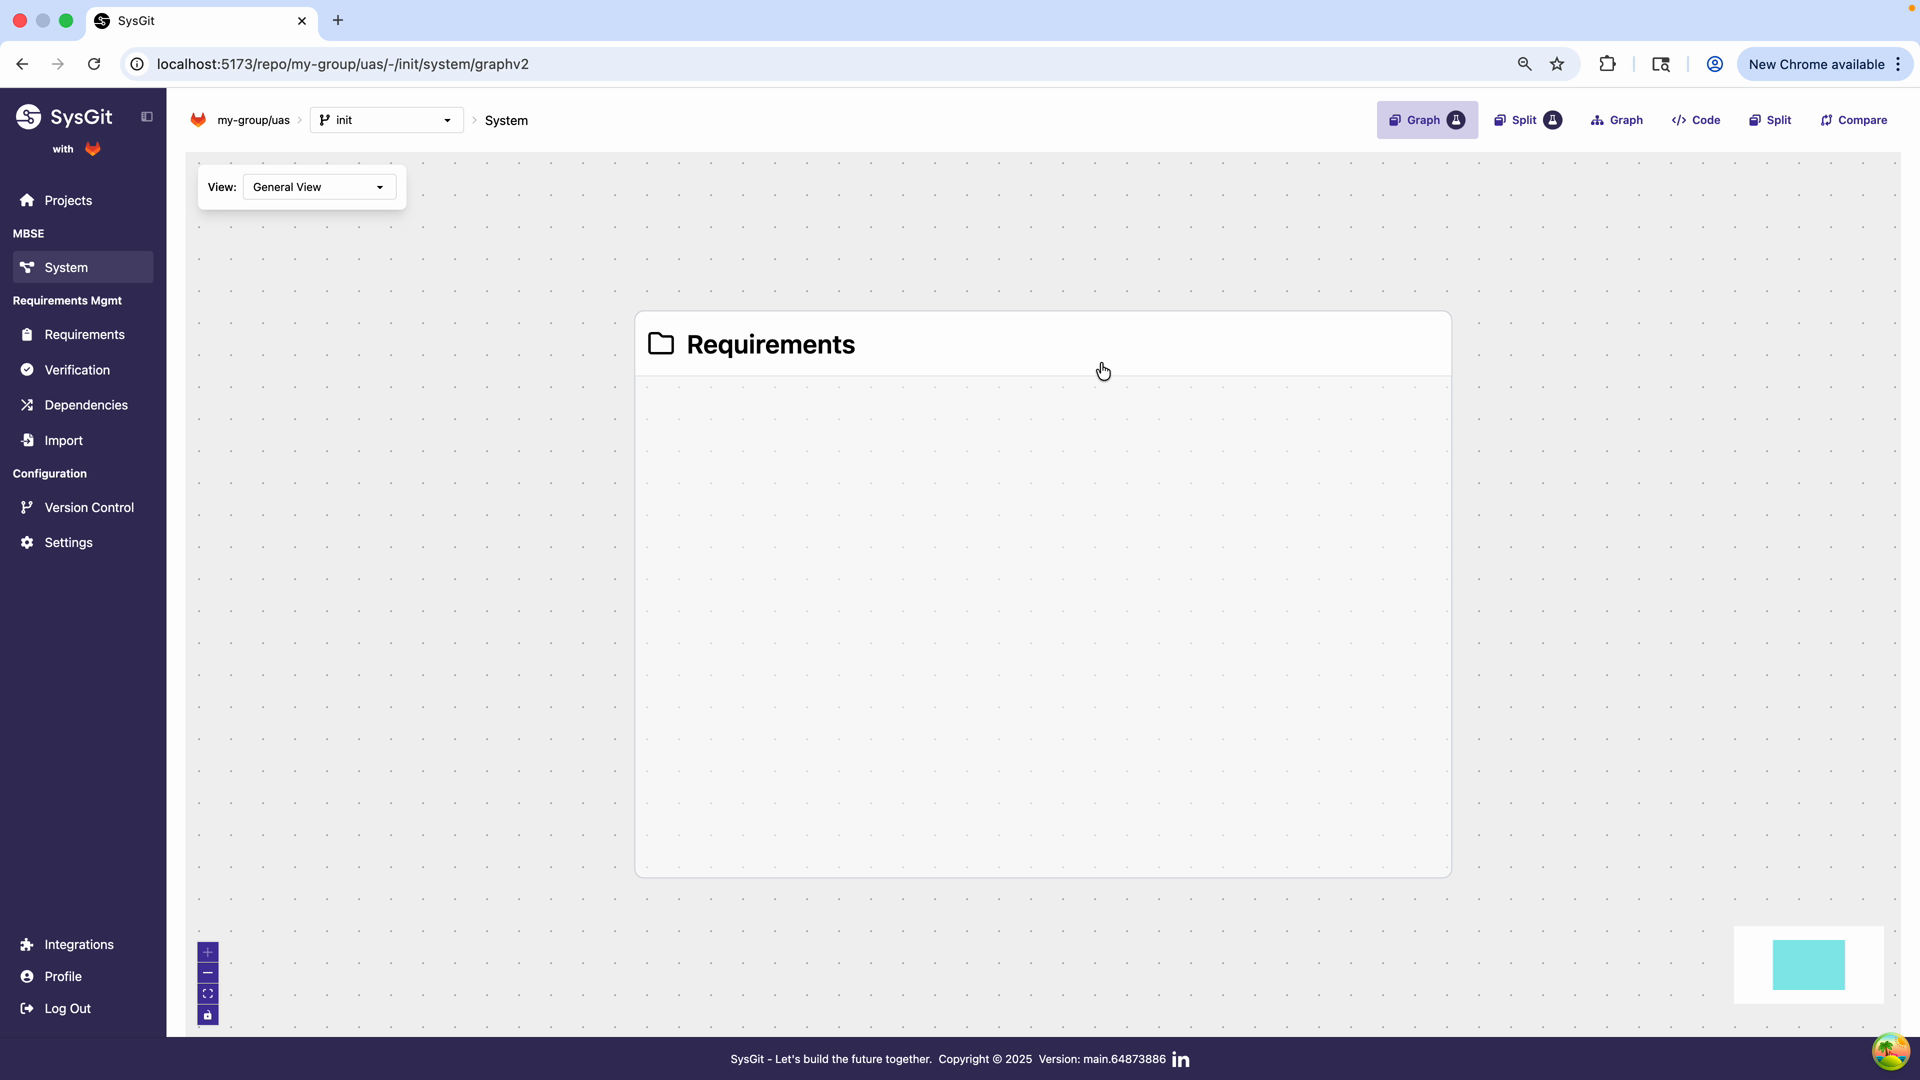
When you first open a project in SysGit, you'll see the Graph View with your empty Requirements package. The left navigation panel shows the project structure with sections for Requirements Management.

Switch to Table View by clicking the table icon in the top navigation bar. You'll see an empty table with columns ready for your requirements. Click the "+ Add Row" button at the bottom to create your first requirement.
You'll see columns for: - ID: Automatically generated based on the requirement's position in the hierarchy - Short Name: A unique identifier like "SYS-001" for easy cross-referencing - Name: A descriptive title for your requirement - Doc: The detailed requirement text (your "shall statement") - Attributes: Measurable characteristics with units - Rationale: Why this requirement exists - Related: Connections to other model elements
Let's create a simple loiter time requirement for an unmanned aerial system:

- Name: Type "Loiter Time" in the Name field

- Doc: Enter "UAS shall have a loiter time of 5 hours over target" in the Documentation field
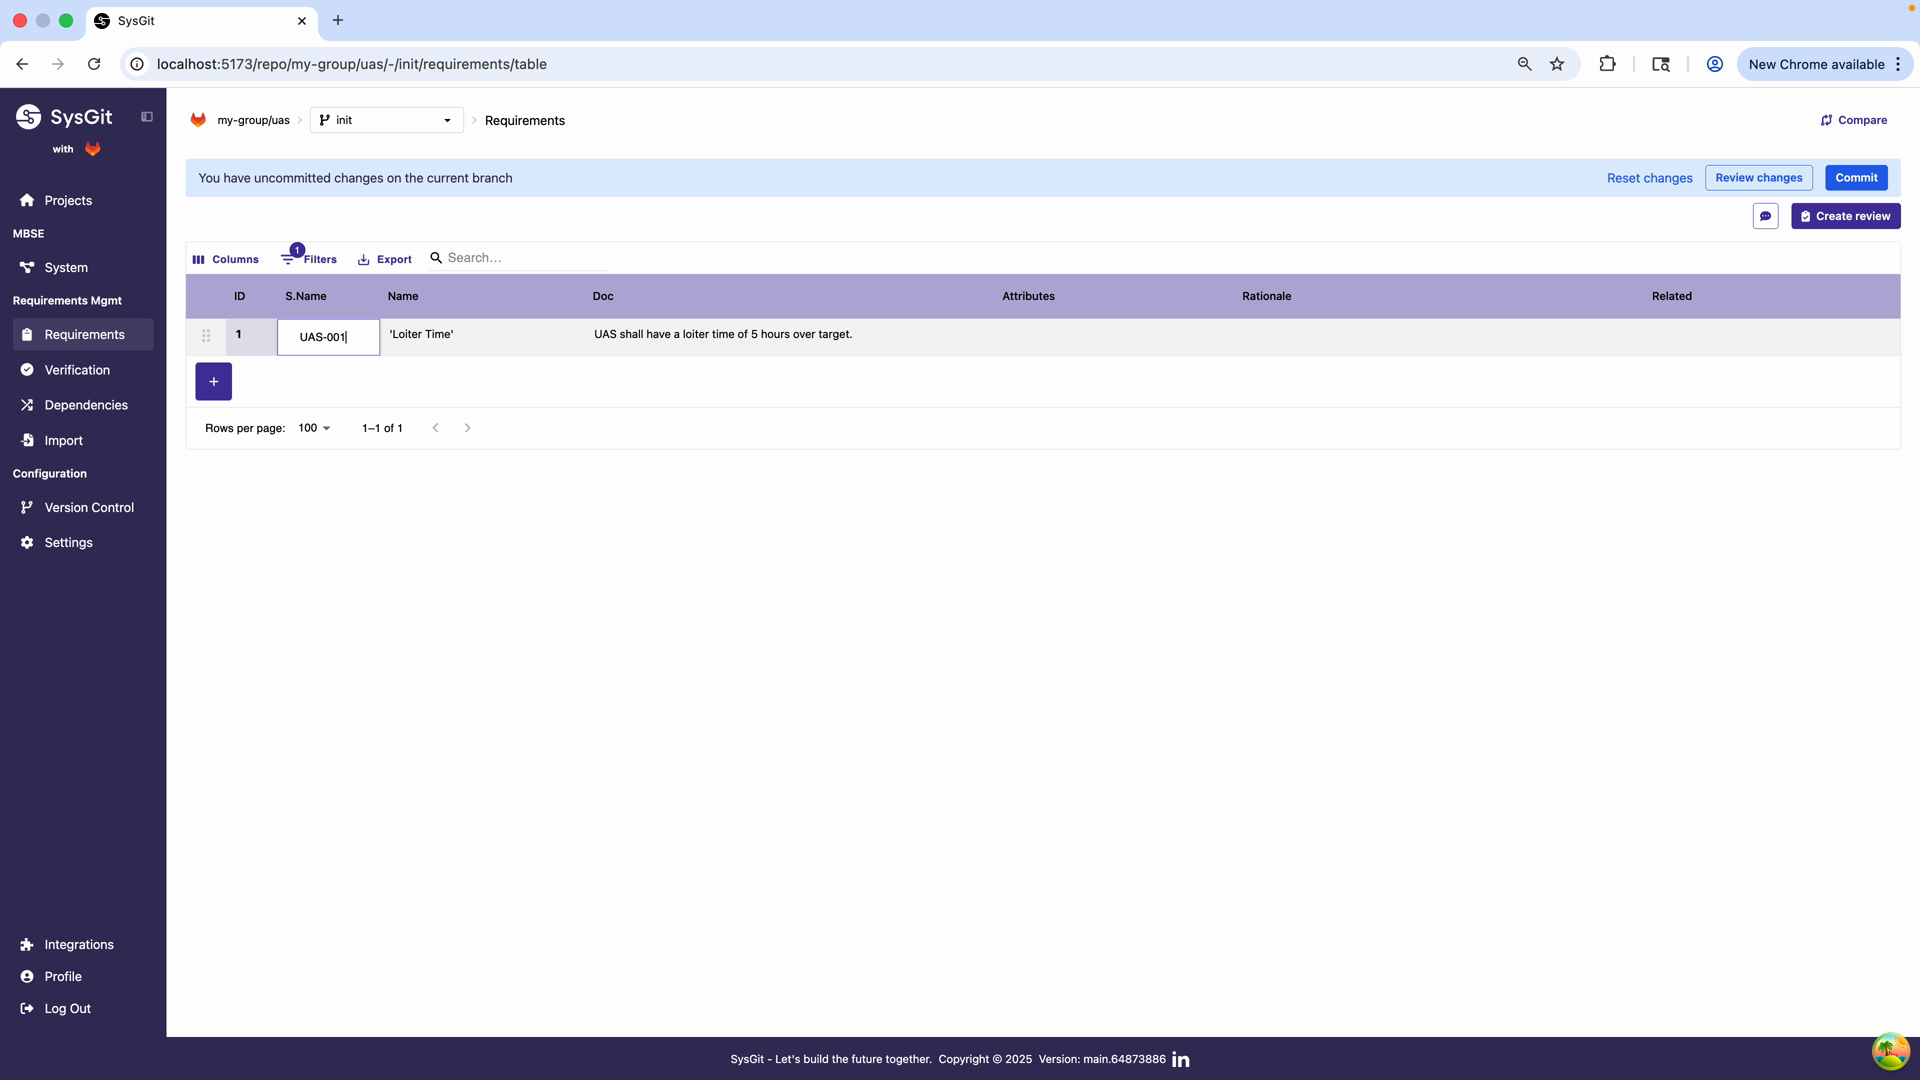
- Short Name: Enter "UAS-001" using a consistent naming convention

- Attributes: Click "Add attribute" in the Attributes column
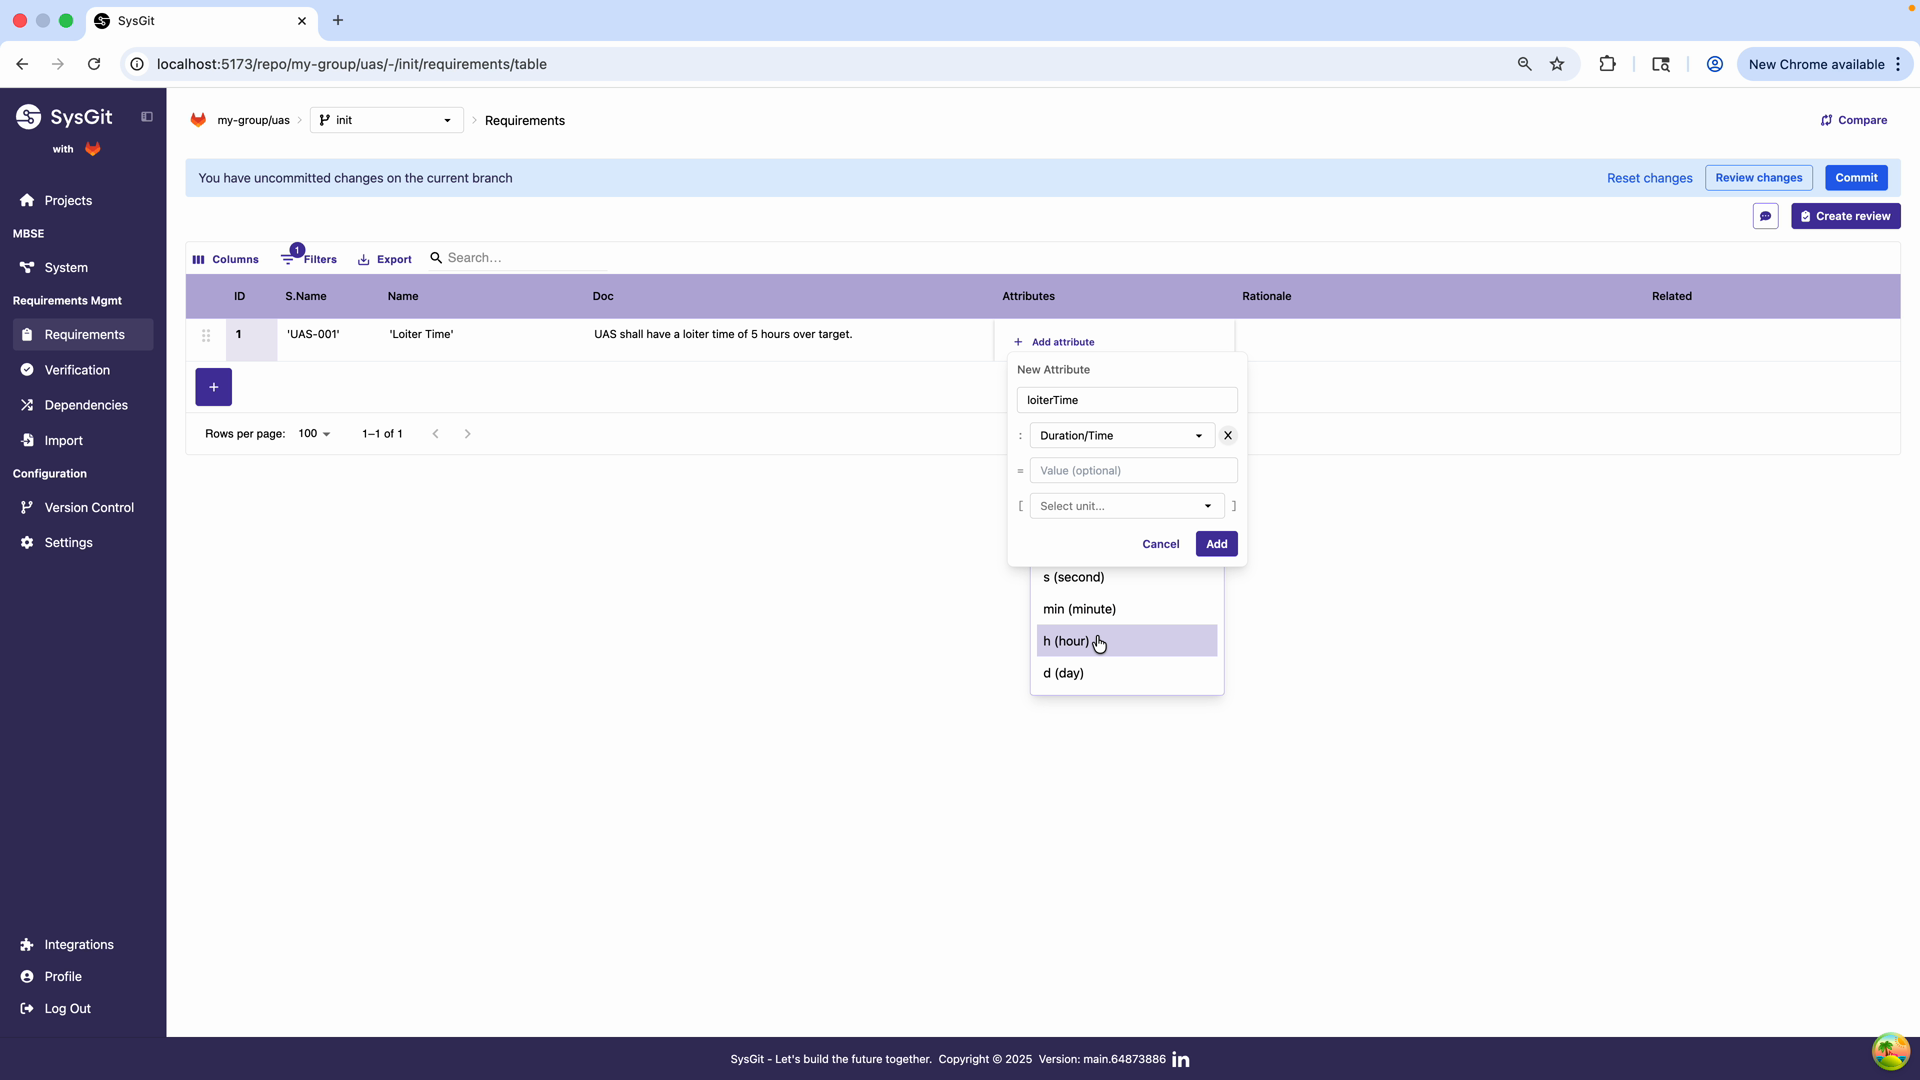
Select "Duration/Time" from the dropdown, then choose "h (hour)" for hours

Enter "5" as the numerical value. The system will store "loiterTime: 5 [h]" as a structured data element.
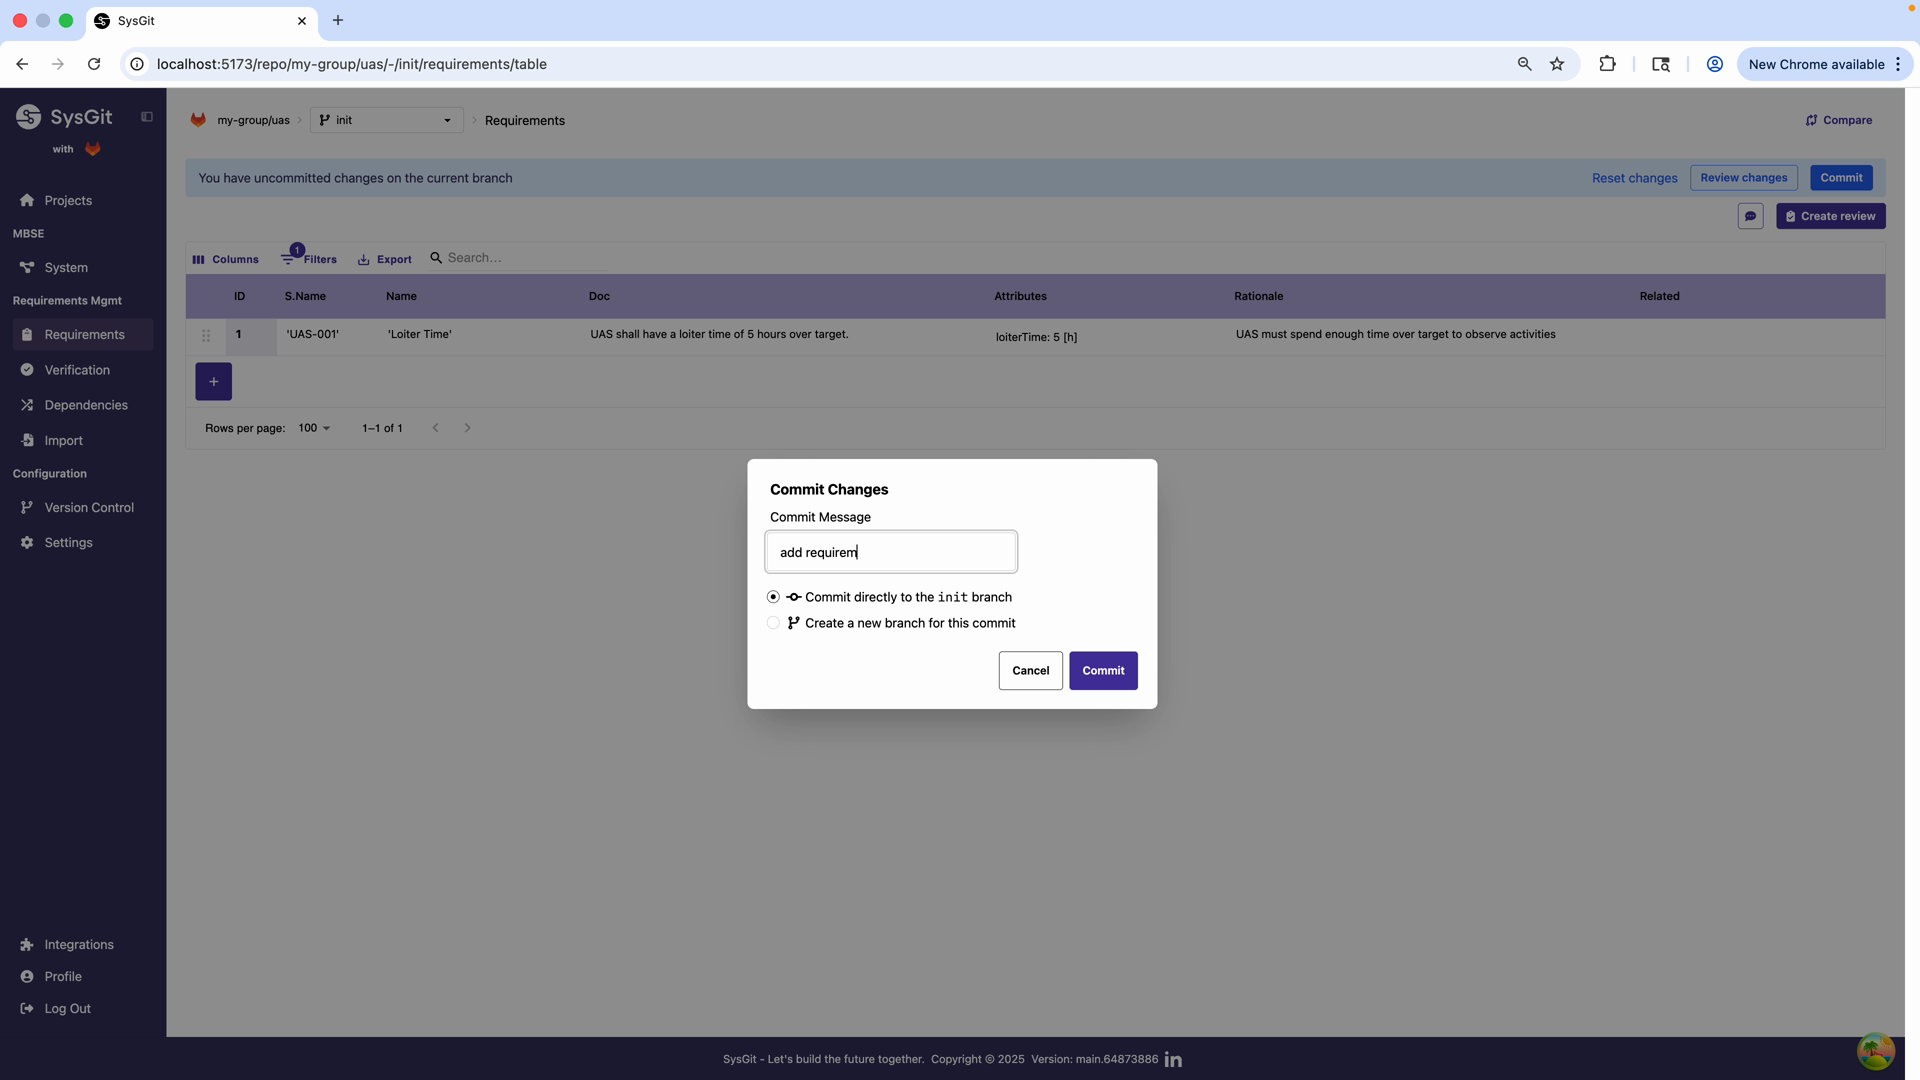
- Rationale: Type "UAS must spend enough time over target to observe activities"
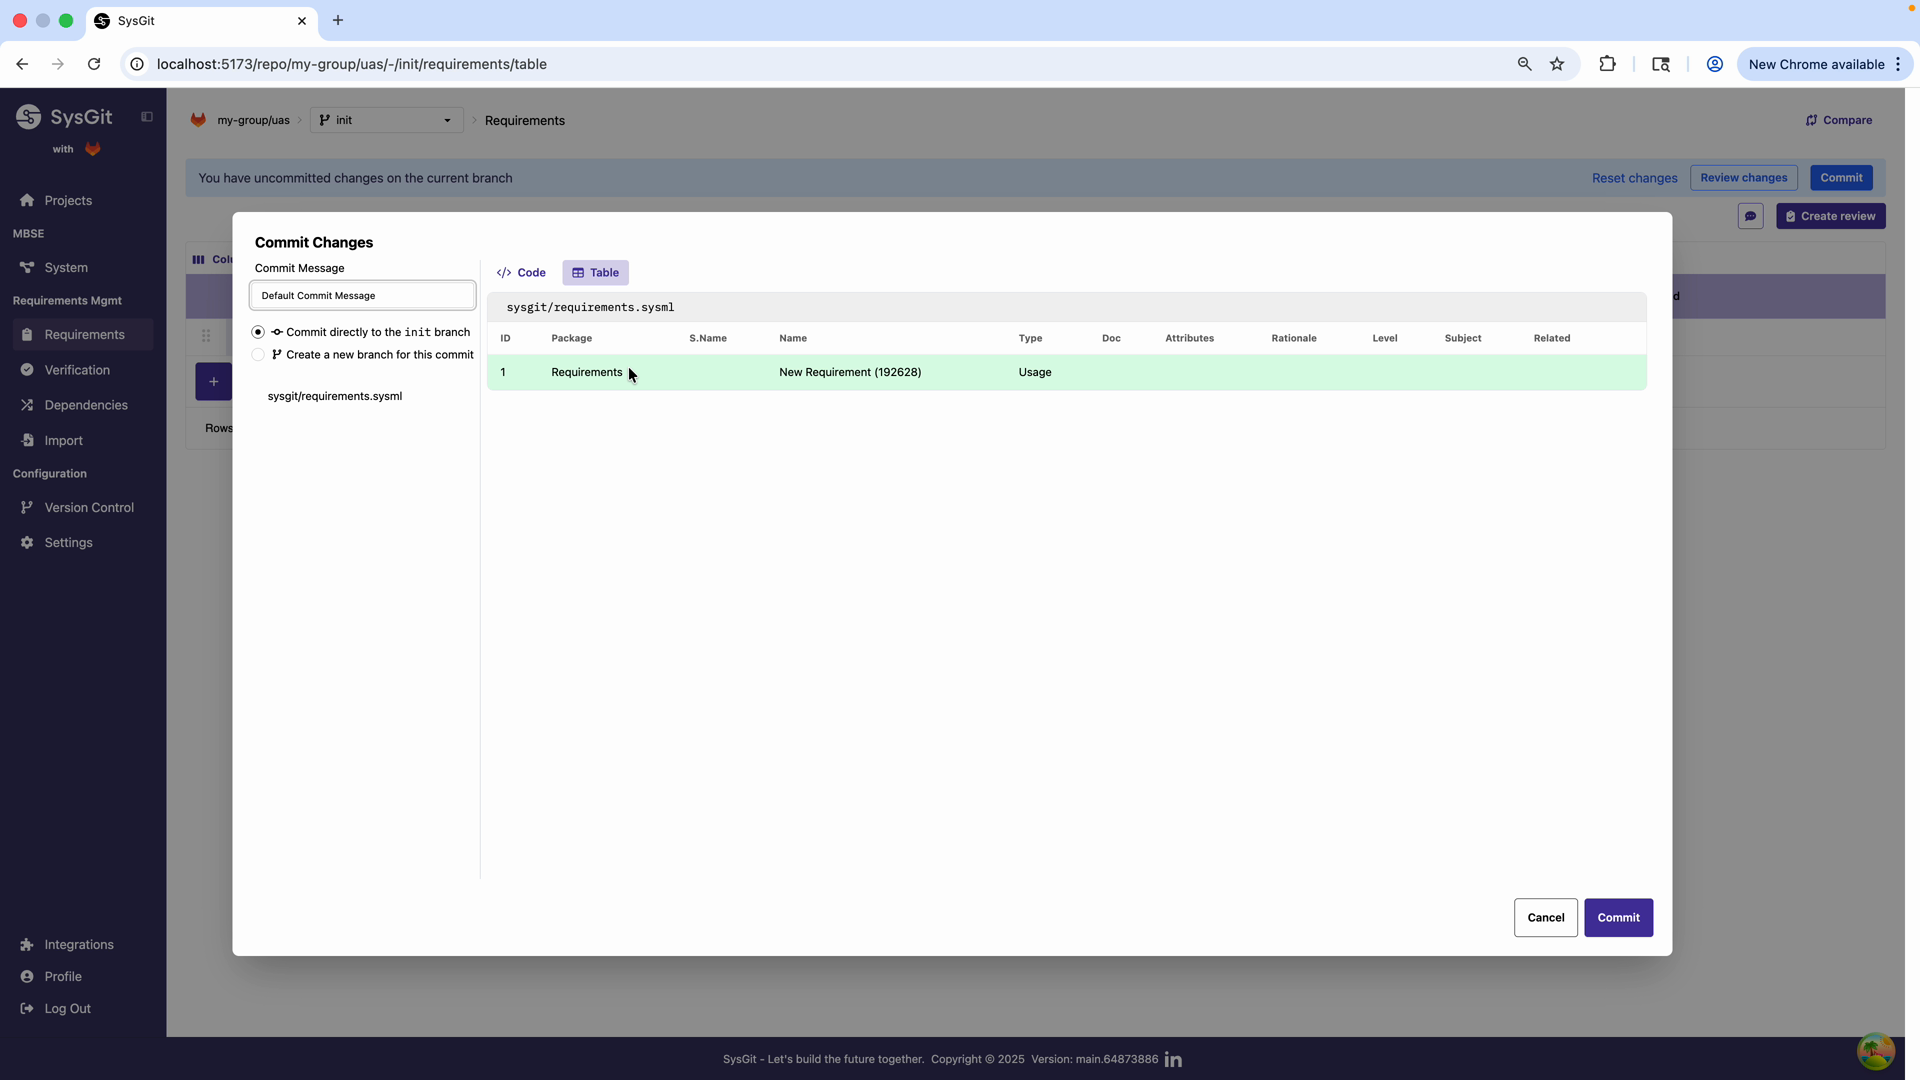
Click "Review Changes" to see what will be saved. The system displays all modifications in both table and code formats.
Enter a descriptive commit message like "add requirement" and click "Commit" to save to your Git repository.
Viewing in Graph View#
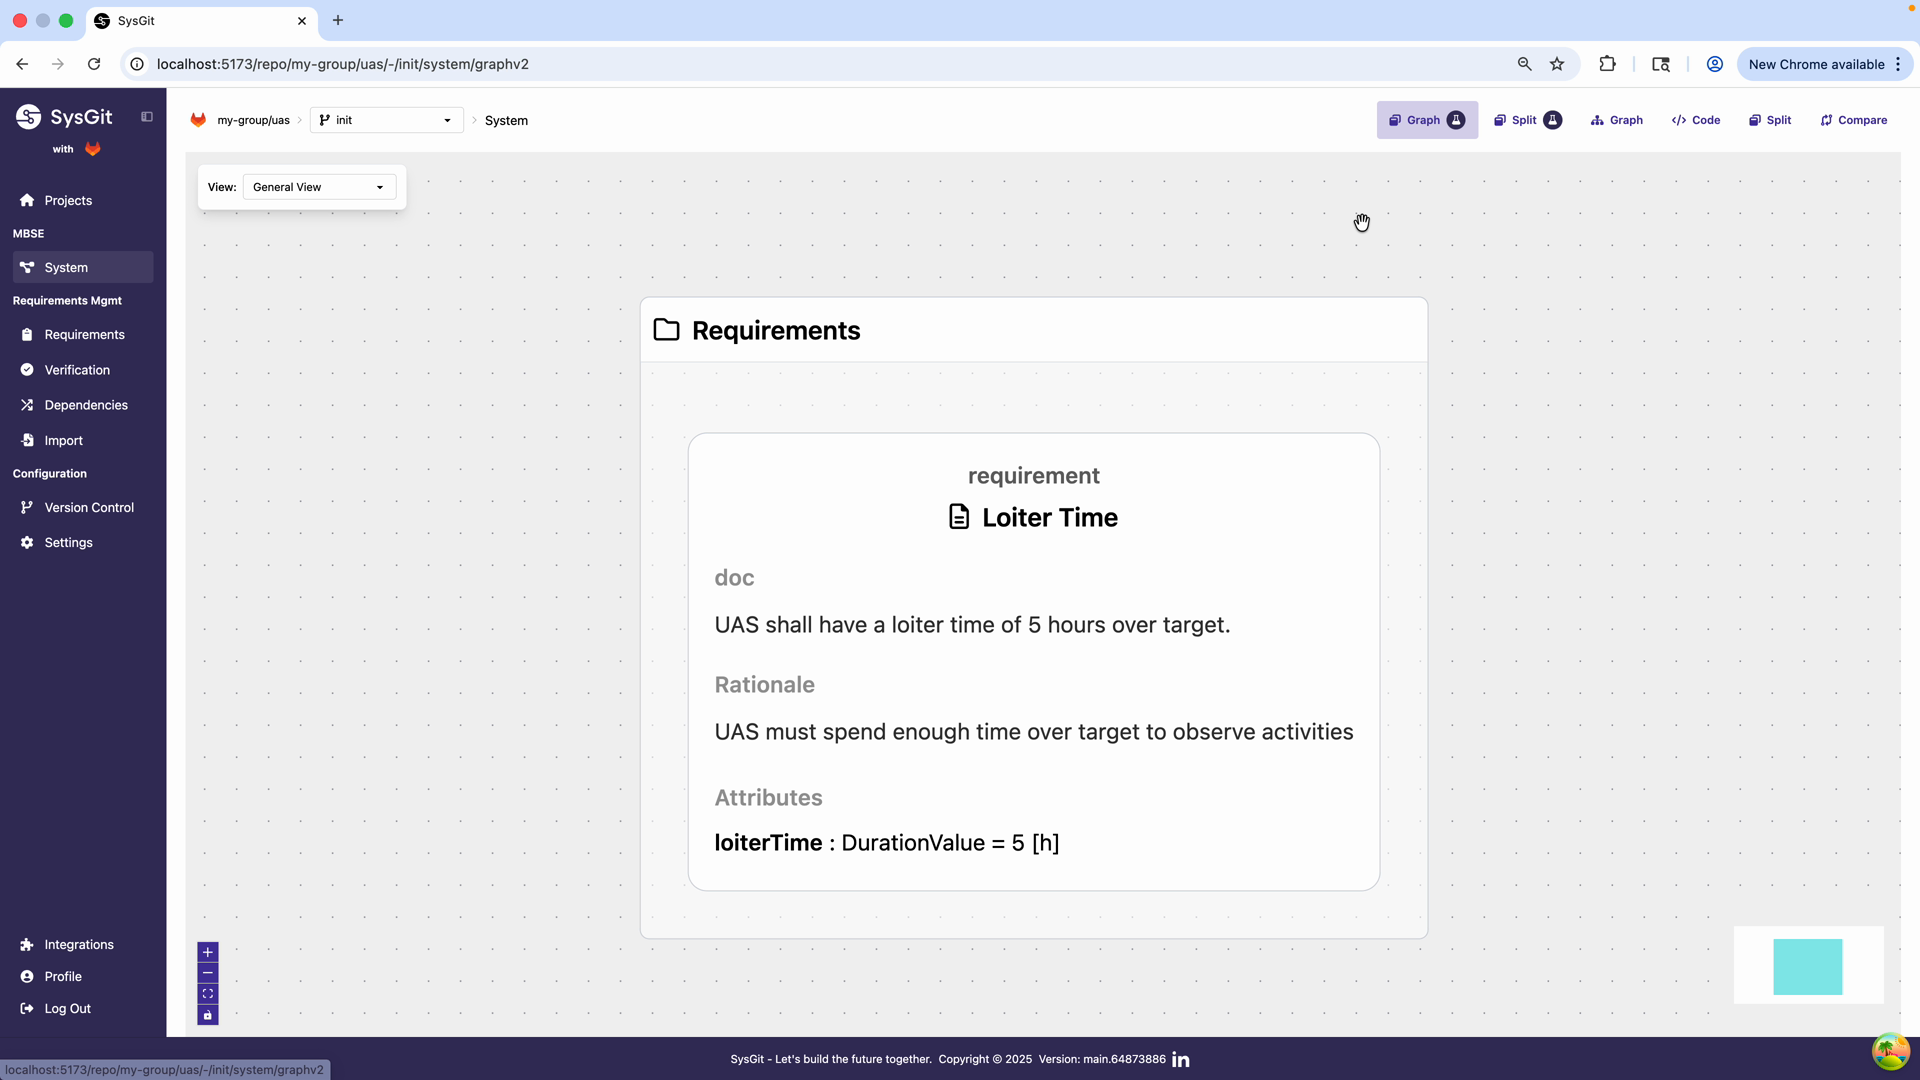
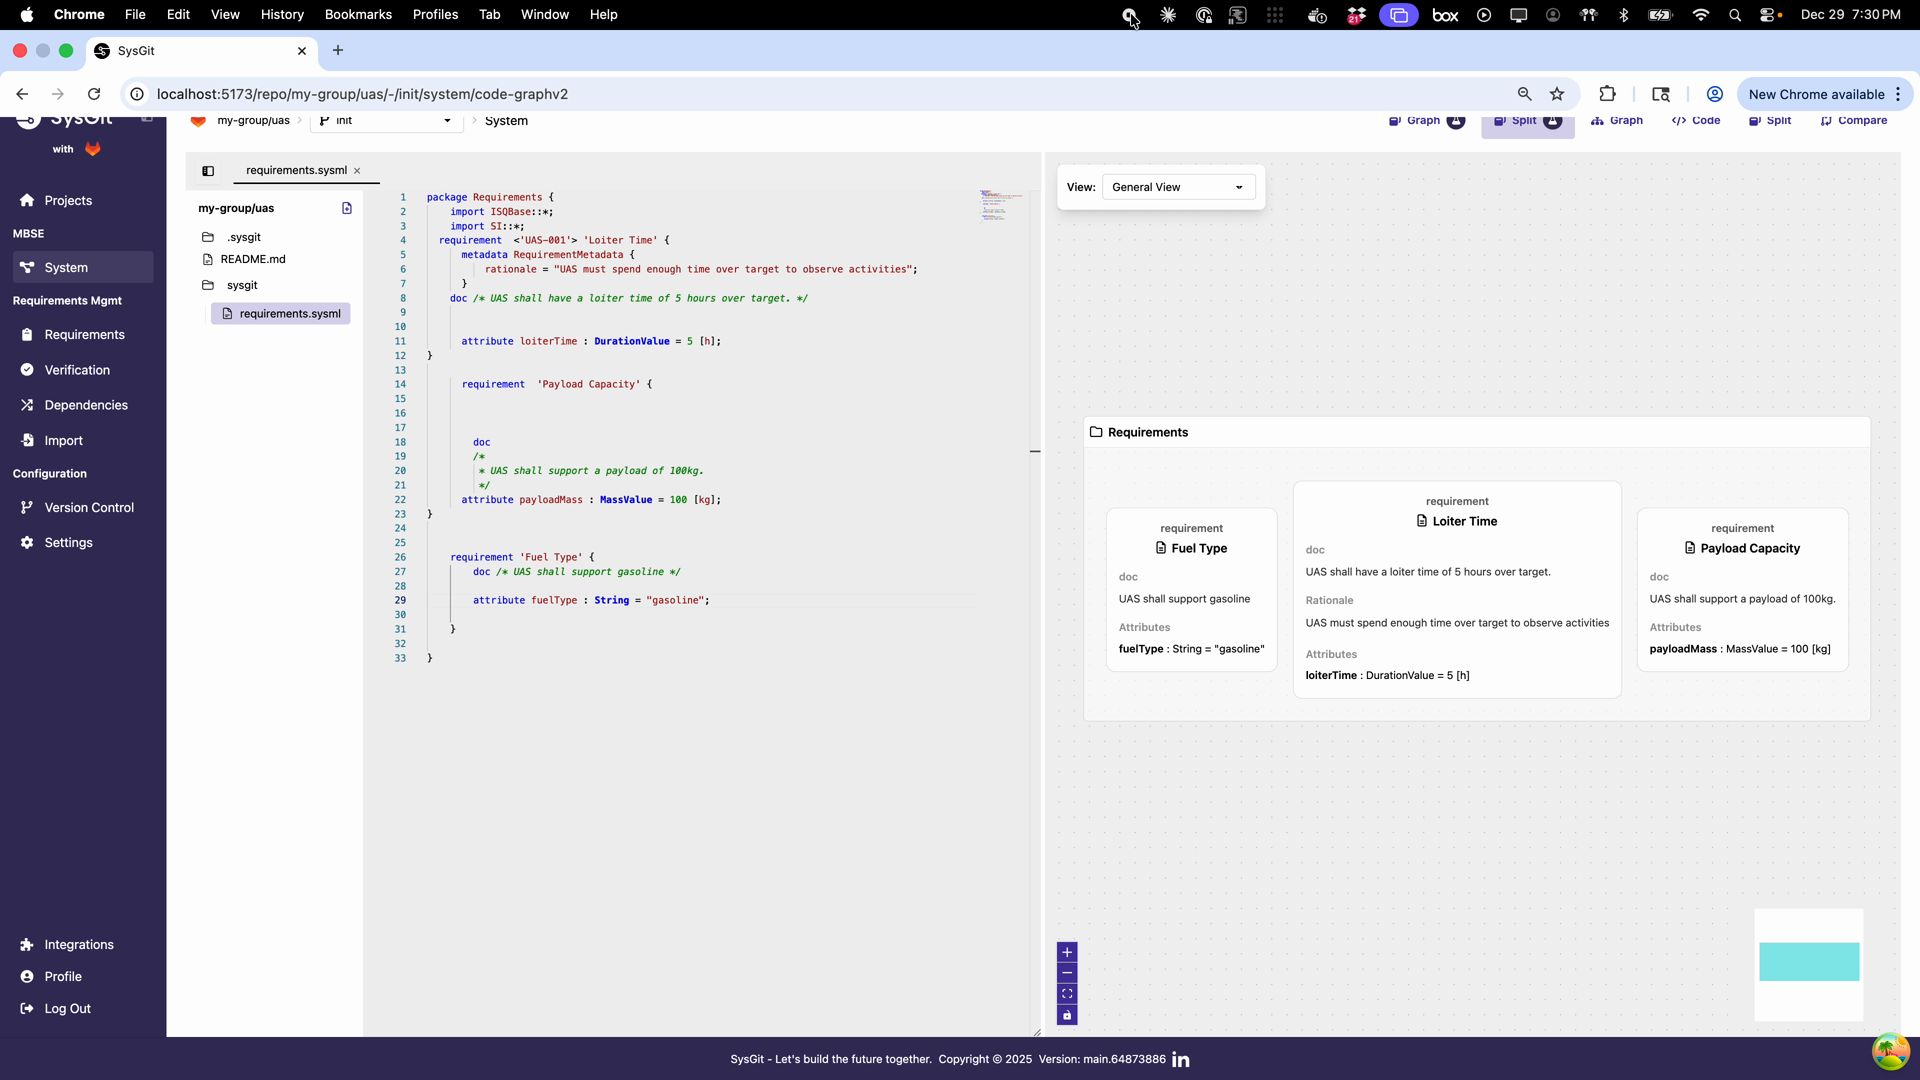
Switch to Graph View by clicking the graph icon. You'll now see your requirement as a visual card showing: - The requirement name as a heading - The documentation text ("UAS shall have a loiter time of 5 hours over target") - Any attributes with their values and units (loiterTime: 5 [h]) - The rationale
This visual representation makes it easy to understand what you've created at a glance.
Seeing the Code#
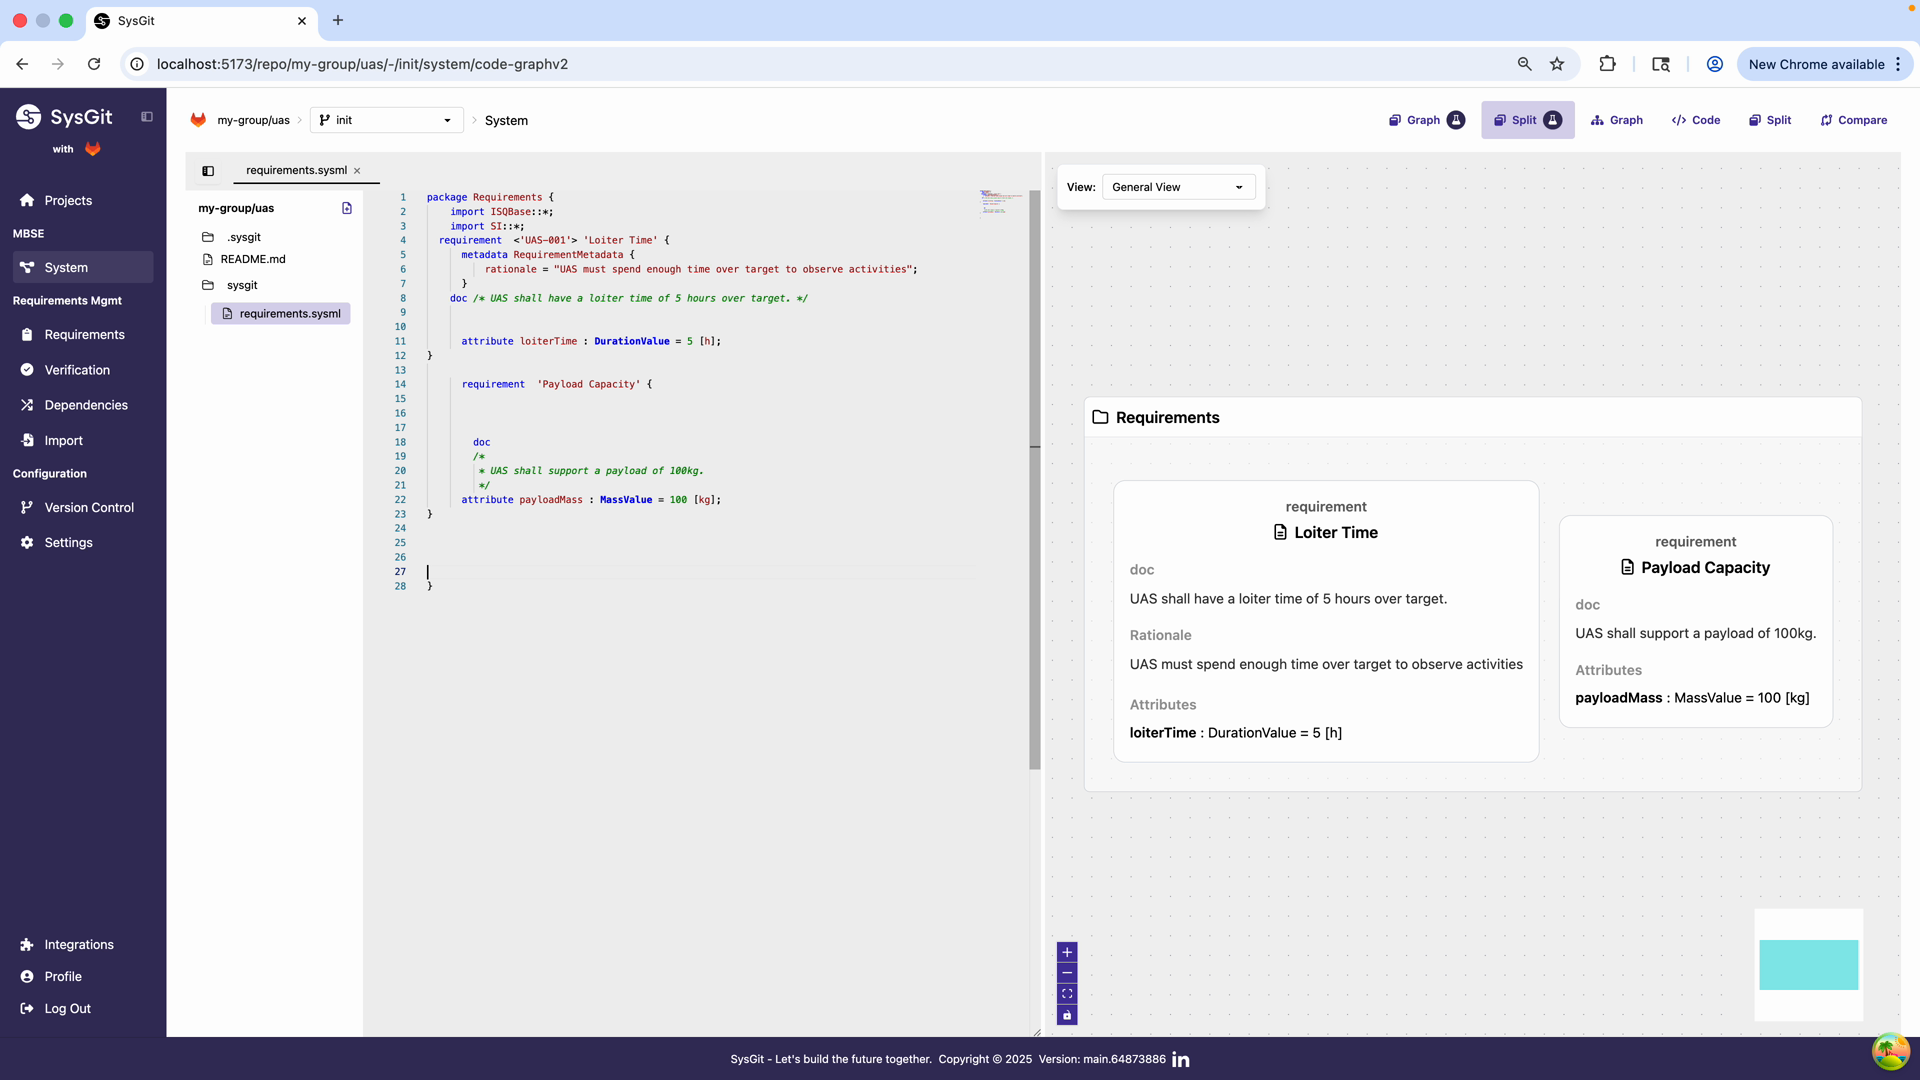
Click the "Code" button to see the underlying SysML v2 textual notation in a split view. The left panel shows the requirements.sysml file with syntax highlighting.

You'll see something like this:
package Requirements {
    requirement <'UAS-001'> 'Loiter Time' {
        doc /* UAS shall have a loiter time of 5 hours over target */

        attribute loiterTime : Duration = 5 [h];

        metadata RequirementMetadata {
            rationale = "UAS must spend enough time over target to observe activities";
        }
    }
}
This is the actual data being stored in your Git repository. It's human-readable, diff-friendly, and fully compliant with the SysML v2 open standard.
Building a Requirement Hierarchy#
Most systems have requirements organized into hierarchies—high-level mission requirements decompose into subsystem requirements, which further decompose into component requirements.
Grouping Requirements#
In Table View, you can create hierarchies by grouping requirements:
- Create several requirements at the same level
- Select multiple rows by clicking the ID column (hold Shift to select a range)
- Right-click and choose "Group Row"
The first selected requirement becomes the parent, and all others become its children. The ID numbering automatically updates to show the hierarchy (1, 1.1, 1.2, etc.).
Working with Groups#
Once grouped: - Children move with their parent - Children can't be moved outside their group - To ungroup, right-click any member and select "Un-group" - You can create multi-level hierarchies by grouping groups
This decomposition structure is fundamental to systems engineering—it lets you trace high-level needs down to detailed specifications.
Adding Attributes#
Attributes make requirements measurable and verifiable. Instead of just saying "the system shall be fast," you specify "the system shall achieve a maximum speed of 100 knots."
SysGit supports typed attributes with proper units:
- Length/Distance: Use
LengthValuewith units like[m],[ft],[nm] - Mass: Use
MassValuewith units like[kg],[lb] - Speed: Use
SpeedValuewith units like[knots],[m/s] - Power: Use
PowerValuewith units like[hp],[W],[kW] - Voltage: Use
ElectricPotentialValuewith units like[V] - Current: Use
ElectricCurrentValuewith units like[A]
These typed attributes ensure consistency and enable automated analysis. When you specify a mass requirement, SysGit knows you mean mass—not just a number.
Understanding the Table Interface#
The Requirements Table is designed to feel natural while generating valid SysML v2 underneath. Here's what you can do:
Adding Rows#
- Click "+ Add Row" at the bottom for a new requirement at the current level
- Right-click any row to insert a new requirement just below it at the same level
Selecting Rows#
- Click the ID column to select a row
- Hold Shift to select multiple consecutive rows
- Hold Cmd/Ctrl to select non-consecutive rows
Moving Rows#
- Select one or more rows
- Right-click and choose "Move Up" or "Move Down" to reorder within the current level
- Moving a parent automatically moves all its children
Keyboard Navigation#
- Use arrow keys to move between cells
- Start typing to edit a cell
- Press Enter to save your changes
- Press Tab to move to the next editable cell
Adding Relationships#
The "Related" column lets you connect requirements to: - Other requirements (derivation, refinement) - System parts (allocation, satisfaction) - Verifications (validation) - Other model elements
Simply use the dropdown to select the target element and relationship type.
Best Practices#
Writing Good Requirements#
Clear shall statements: Use precise, unambiguous language. "The system shall achieve a maximum speed of 100 knots" is better than "The system should be pretty fast."
Measurable criteria: Include attributes with specific values and units whenever possible. This makes verification straightforward.
One requirement per statement: Each requirement should specify one thing. If you use "and," you probably need multiple requirements.
Rationale documentation: Always explain why a requirement exists. Future team members (including future you) will appreciate the context.
Naming Conventions#
Short names: Use a consistent prefix scheme like SYS-001, PROP-042, PWR-015. This makes requirements easy to reference in conversations, documents, and code.
Descriptive names: Make names specific enough to understand at a glance. "Maximum Cruise Speed" is clearer than "Speed Requirement."
Consistency: Establish naming conventions early and document them. Consistency makes large models navigable.
Organizing Requirements#
Package structure: Group related requirements into logical packages (Mission Requirements, Performance Requirements, Interface Requirements, etc.).
Hierarchy depth: Don't nest too deeply. Three to four levels is usually sufficient. Overly deep hierarchies become hard to navigate.
Decomposition logic: Each level of decomposition should represent a meaningful refinement. Top-level mission requirements decompose into system requirements, which decompose into subsystem requirements.
Version Control Habits#
Meaningful commit messages: Describe what changed and why. "Added thermal requirements for battery system" is better than "Updated requirements."
Review before committing: Use the "Review Changes" dialog to verify what you're about to save. Catch errors before they enter history.
Commit frequently: Small, focused commits are easier to understand and easier to revert if needed.
Branch for experiments: Use Git branches to explore different requirement structures without affecting the main model.
Common Workflows#
Importing Existing Requirements#
If you have requirements in spreadsheets or other tools, you can import them into SysGit. The Table View's familiar interface makes this process straightforward:
- Copy requirement text from your source
- Add rows in SysGit
- Paste and organize the content
- Add attributes, rationale, and relationships
- Commit your changes
Detailed import capabilities are covered in the Advanced section.
Deriving Requirements#
System requirements often derive from higher-level customer requirements:
- Create the parent (customer) requirement
- Create child requirements that decompose or refine it
- Use the "Related" column to establish derivation relationships
- Document why each derived requirement is necessary in the rationale
This creates clear traceability from customer needs to technical specifications.
Creating Requirements in Graph View#
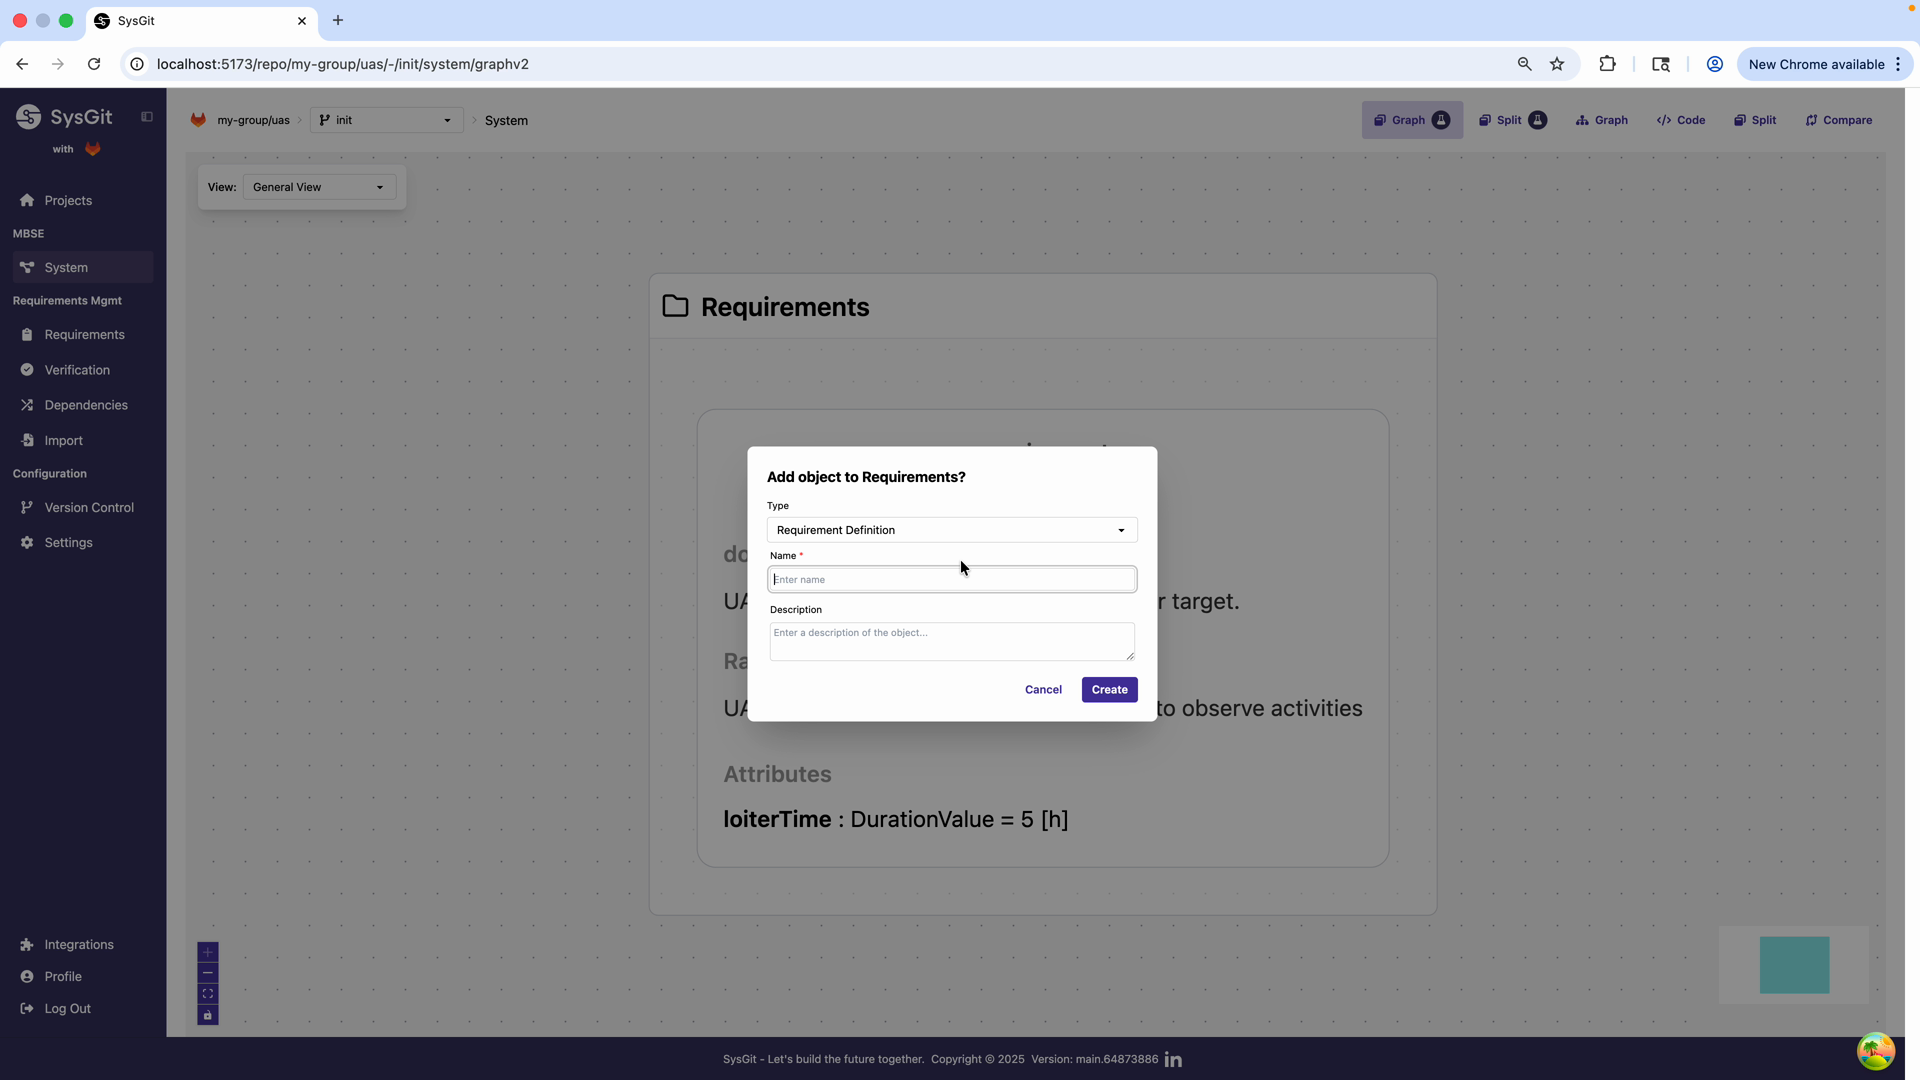
You can also create requirements directly in Graph View. Click the "+" button at the bottom of the Requirements package. A dialog appears where you select "Requirement Definition" and enter a name.
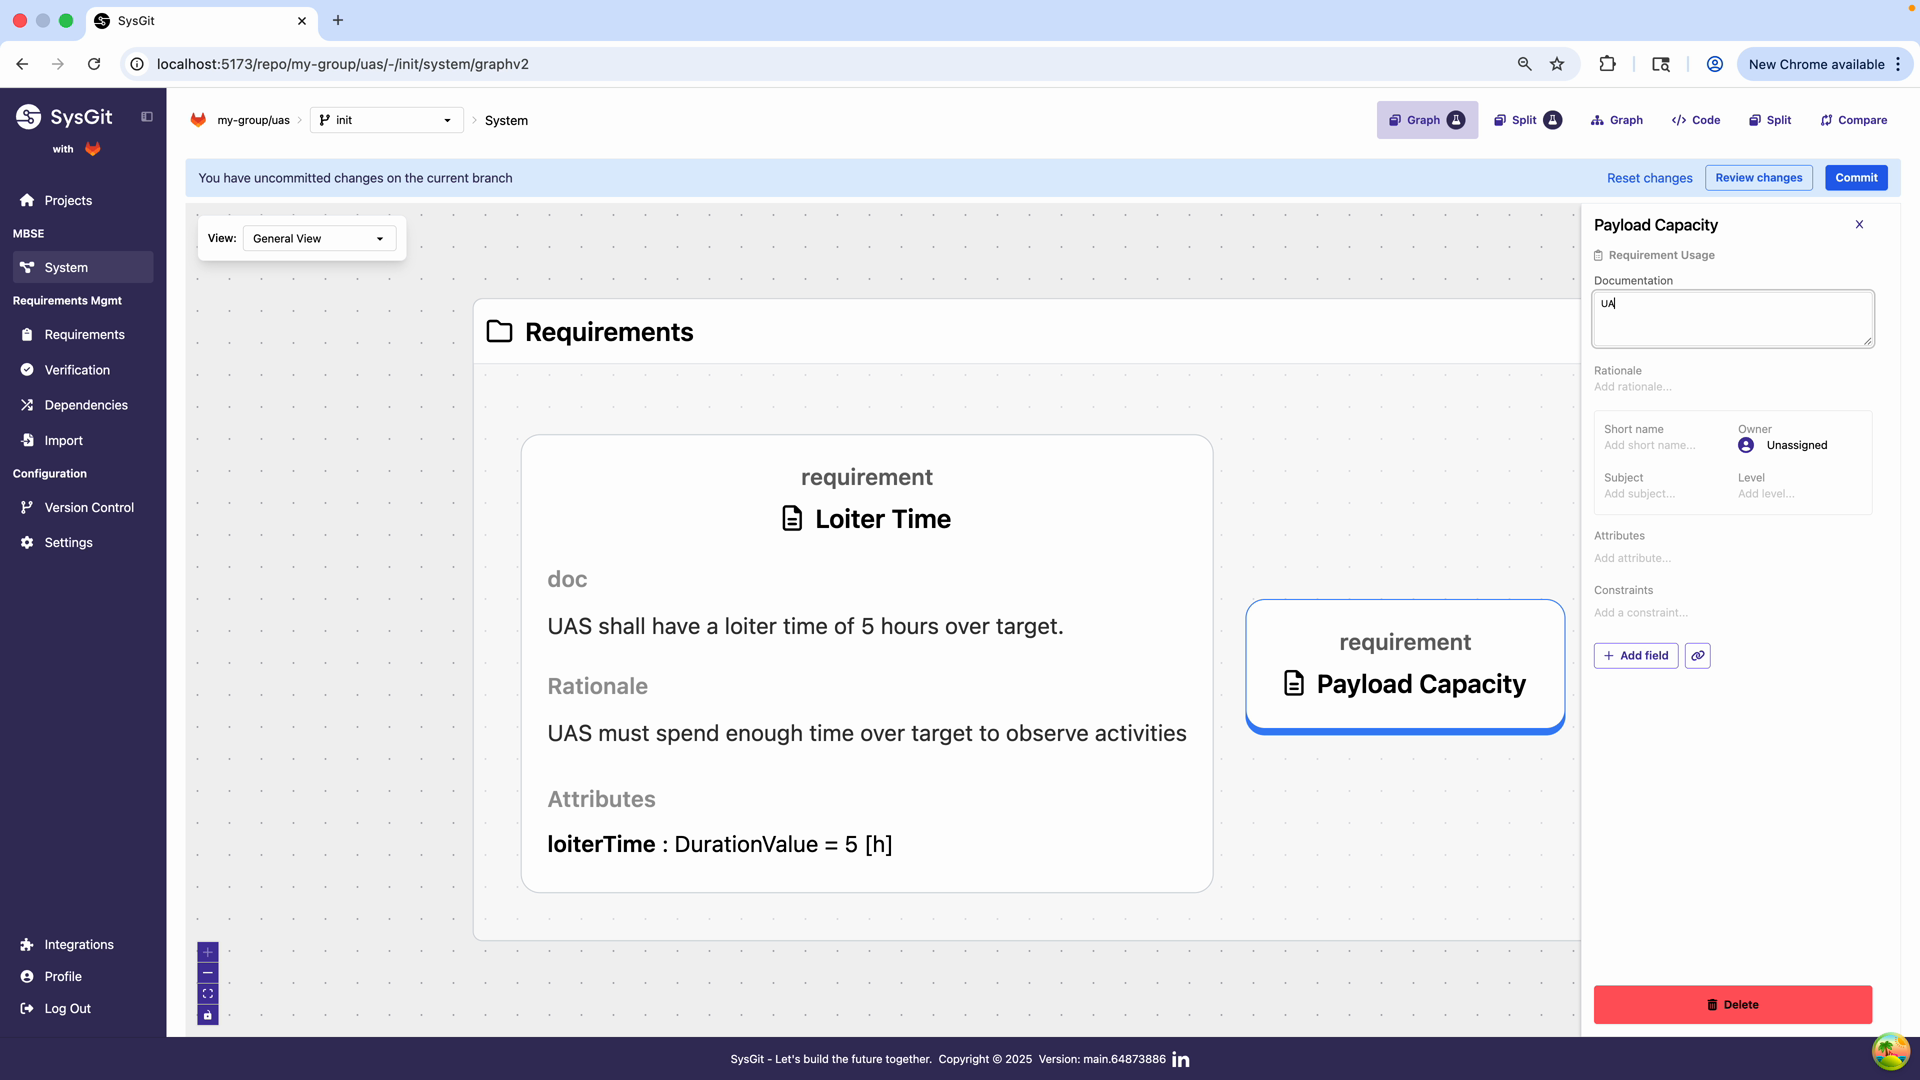
After creating the requirement, a side panel opens with all the requirement properties. You can fill in documentation, rationale, short name, and attributes all in one place.
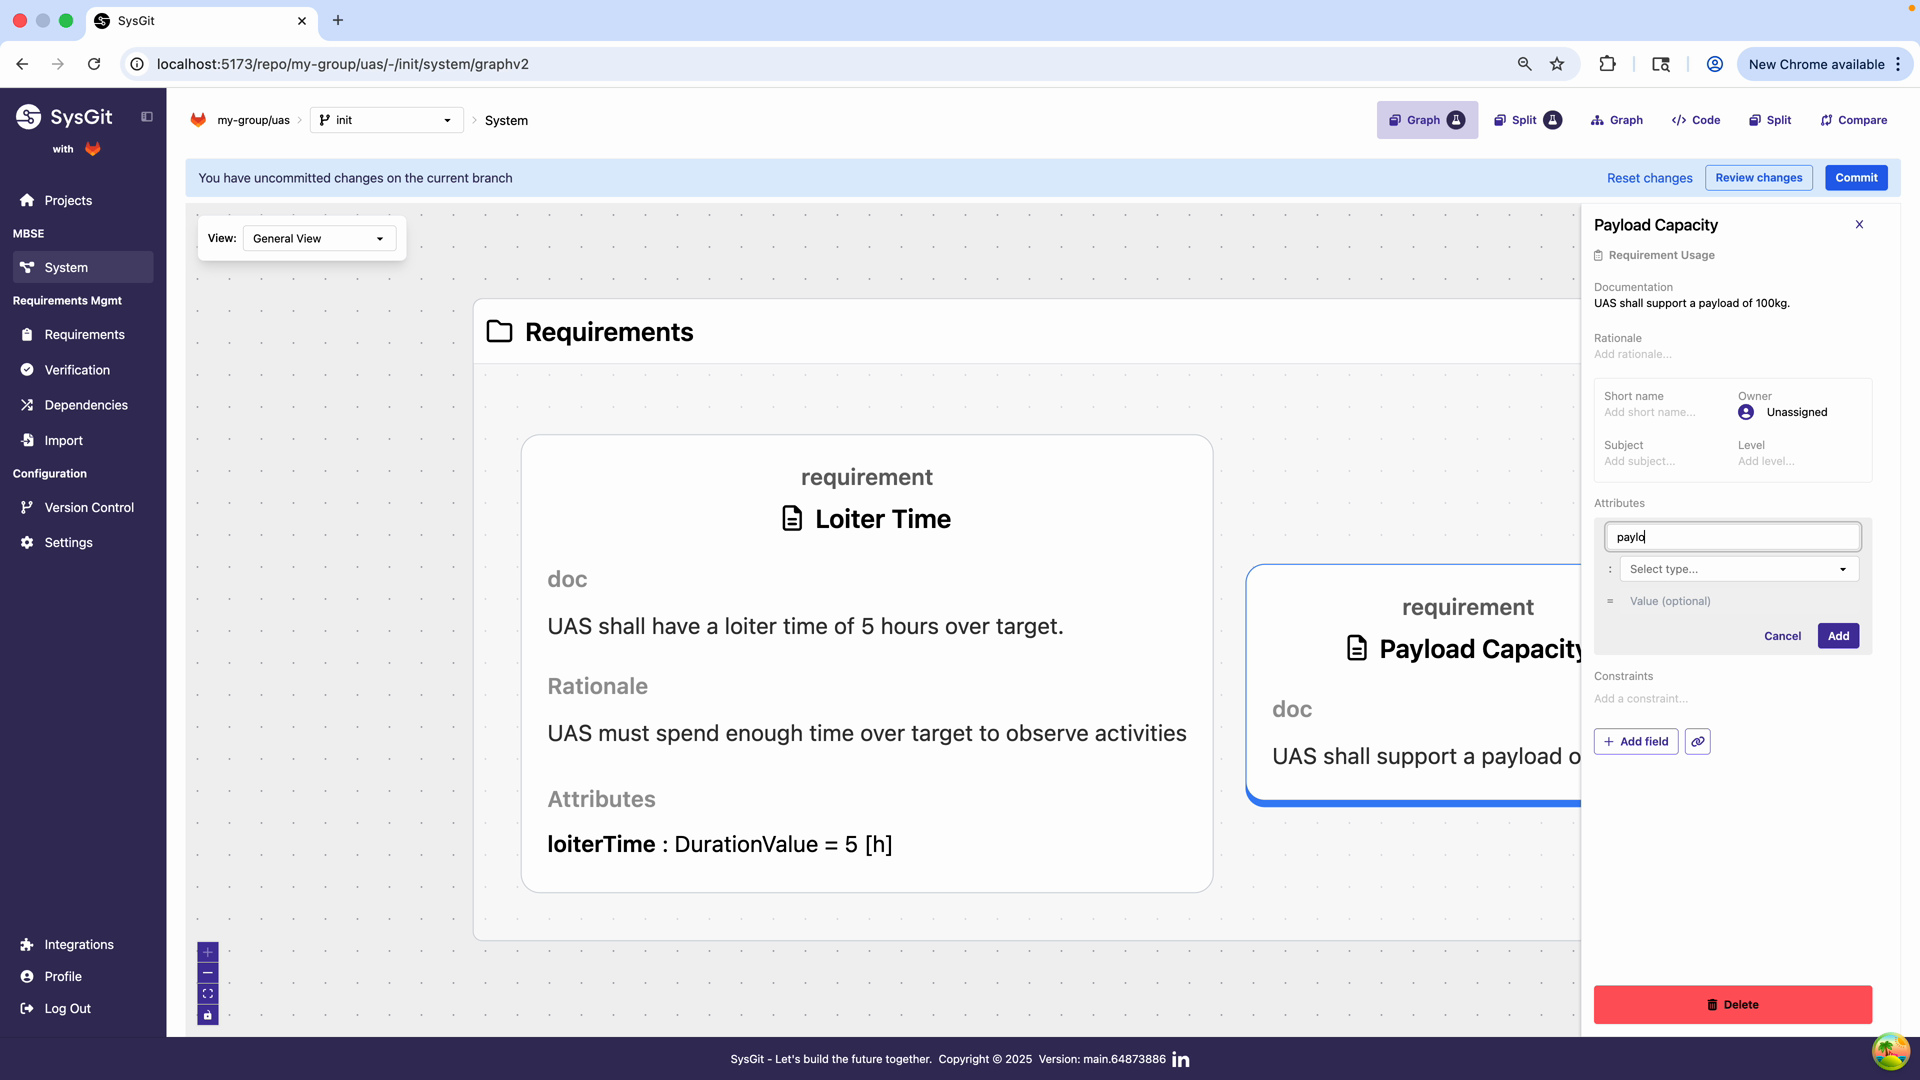
For example, you might create a "Payload Capacity" requirement with documentation "UAS shall support a payload of 100kg" and add a mass attribute.
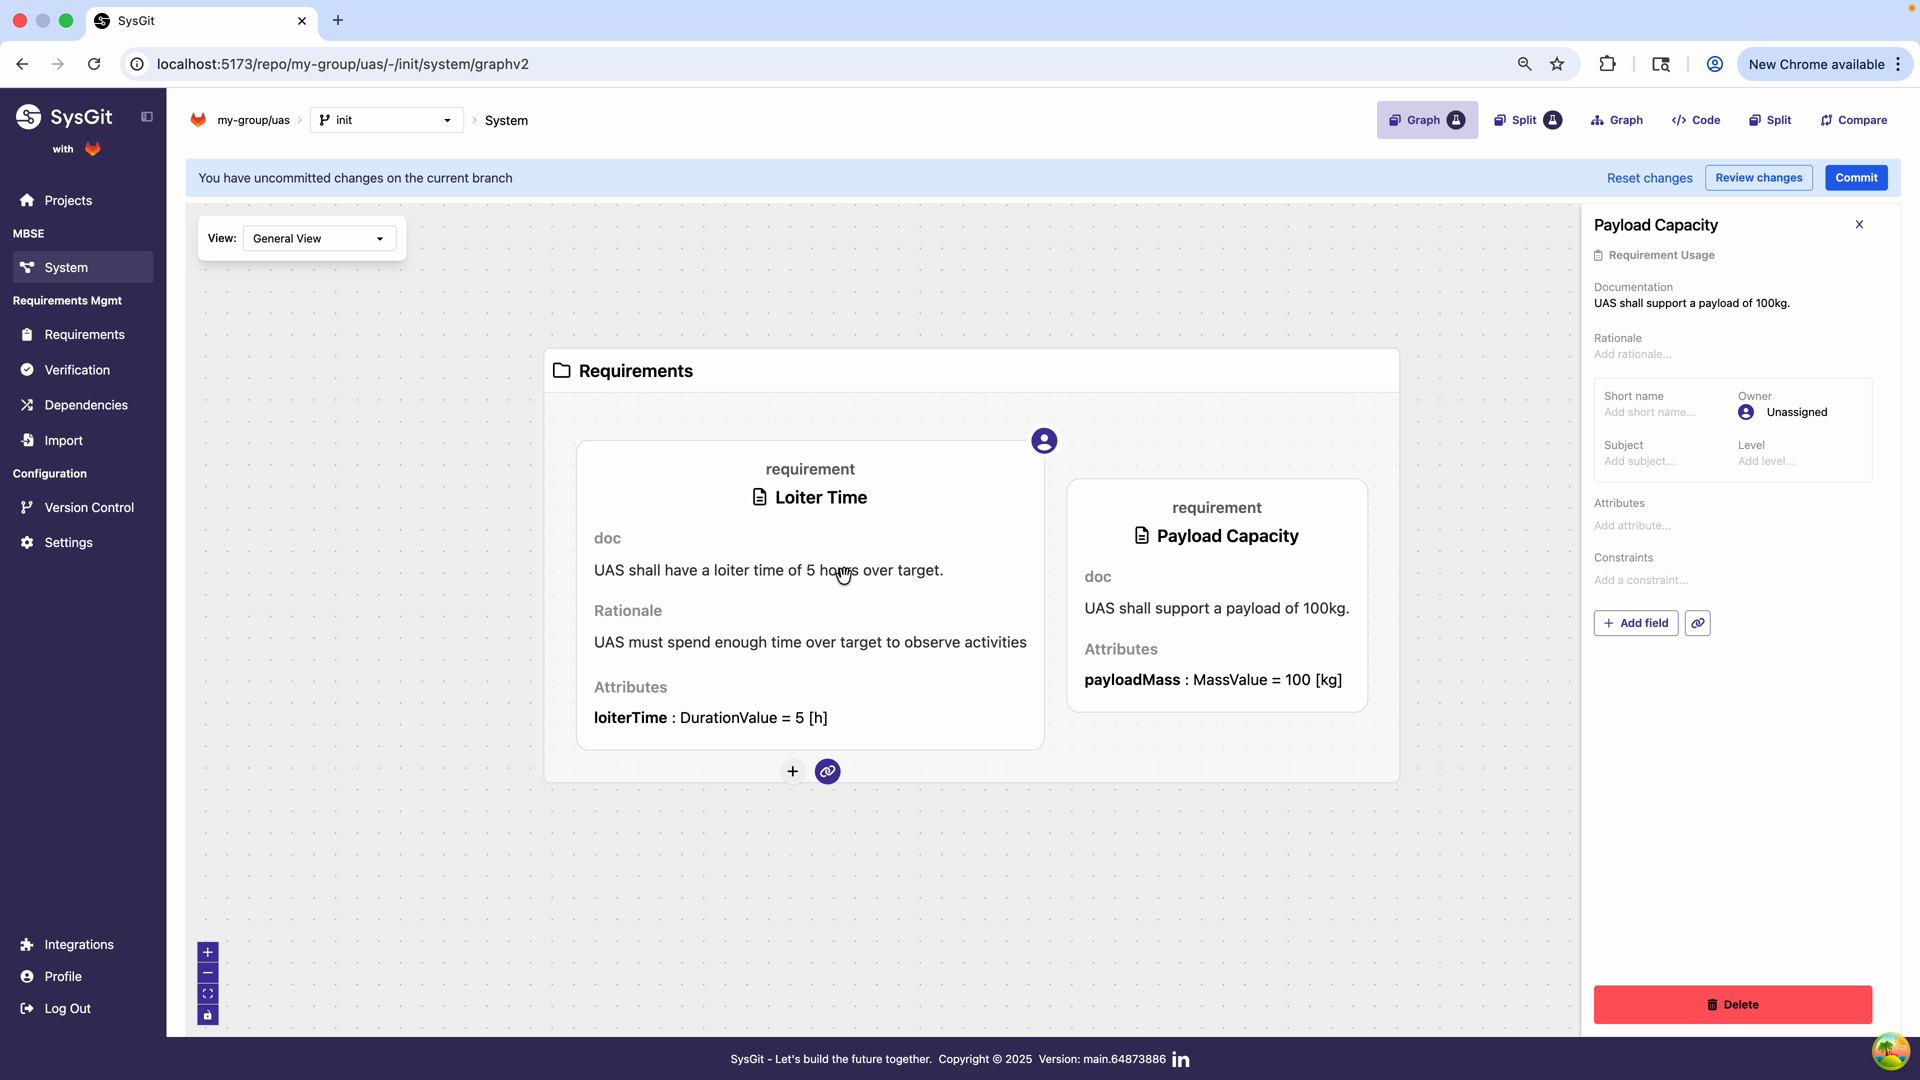
The Graph View now displays both requirements as visual cards, making it easy to see your model structure at a glance.
Creating Requirements in Code View#
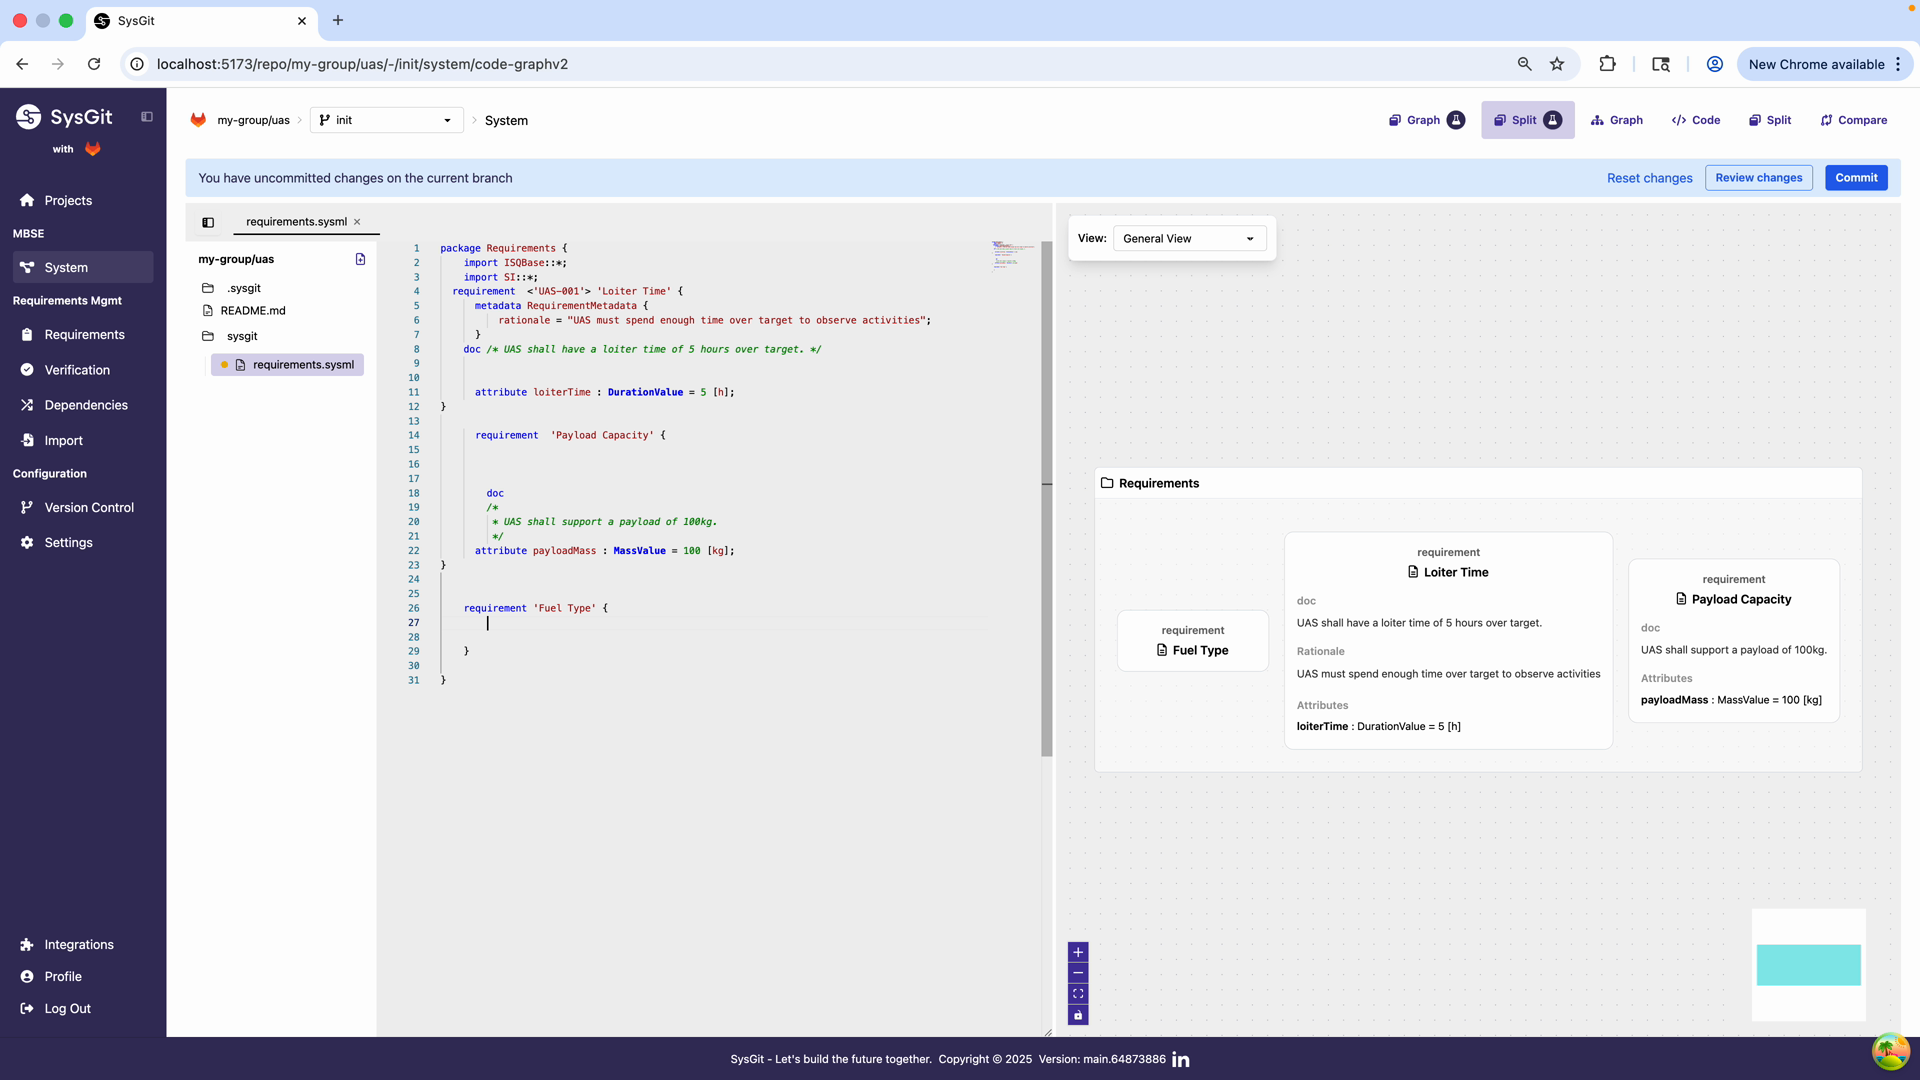
Advanced users can create requirements directly in the code editor. Simply scroll to the end of the Requirements package and start typing a new requirement definition.

Add documentation using the doc /* */ syntax for inline documentation that appears in all views.

Define attributes with the attribute keyword, specifying the type and default value.
Save the file and the graph automatically updates to show your new requirement. All three views stay synchronized—changes in one immediately appear in the others.
Allocating to System Elements#
Requirements eventually need to be assigned to system parts:
- Define your system structure (covered in System Modeling)
- In the Requirements Table, use the "Related" column
- Select the target part and choose "allocate to"
- This creates a formal link between requirement and implementation
Connecting to Verifications#
Every requirement should have a way to verify it's been met:
- Create verification activities (covered in Verification Management)
- In the verification, reference the requirements being verified
- The Verification Matrix shows coverage at a glance
- Identify and address any gaps in verification coverage
What Makes SysGit Different#
It's Actually Git#
When you commit requirements in SysGit, you're committing to a real Git repository. This means: - Full version history with diffs - Branch and merge workflows - Standard Git collaboration tools (pull requests, code review) - Integration with CI/CD pipelines - No proprietary data formats or vendor lock-in
It's Open Standards#
SysGit stores everything as SysML v2 textual notation—an open standard developed by the Defense Industrial Base. This means: - Your data is never locked into a proprietary format - Any SysML v2 tool can read your models - You can use standard text processing tools - The format is human-readable and diff-friendly
It's Post-Cloud#
SysGit leverages your existing Git infrastructure (GitHub, GitLab, Gitea) rather than creating new data silos. This means: - Your requirements inherit your Git provider's security - Single sign-on and access controls work automatically - Data lives in repositories you control - Compliance posture matches your existing Git usage
Next Steps#
Now that you understand the basics of requirements management in SysGit, you're ready to explore:
- Verification Management: Learn how to define verification activities and prove requirements are met
- Traceability: Explore relationship types and traceability matrices
- System Modeling: Define system structure and allocate requirements to parts
The real power of SysGit emerges when you use these features together—requirements, verifications, system models, and traceability form an integrated whole that gives you complete visibility into your development program.
Getting Help#
If you get stuck or have questions:
- Explore the visual tooltips and help text in the interface
- Check the SysML v2 Language Reference for syntax details
- Contact your team's SysGit administrator
Remember: the three views are always available. If something is confusing in one view, try another. The Table View, Graph View, and Code View each offer different perspectives on the same underlying model—use whichever makes the most sense for your current task.